
I rather like sewing, to be honest. Like every other creative act, it has its tedium, but having a well-made fabric costume component completed by your own hands is such a wonderfully rewarding feeling. Flashy armor, props, and helmets are awesome and super fun to make, but poor underlying fabric work can really bring down a costume experience for me. So every time I am presented with some kind of fabric work, I make an earnest effort to exceed the quality of my previous sewing work. This project had a few key areas that would really test my abilities: an inner shirt, two padded armor skirts, the vest onto which the armor plating is attached, and the glove pads.
A lot of my sewing projects thus far have been minor components – balaclavas, shoulder pads, simple spandex gloves, stuff like that, stuff that can be patterned flat rather easily. This project would require custom patterning, though. As I’ve grown in the costuming community, I’ve learned to appreciate totally custom patterning from scratch. Modifying existing patterns has its place and is a good starting point, but if you want to shoot for accuracy and quality from the get go, there’s no better way than to make your patterns from scratch. By doing so, you gain a valuable, intensely intimate knowledge of your build. You understand how it’s put together and why it’s put together that way, and that knowledge can make or break your stress levels later into the build when deadlines are looming. So I’ll say right off the bat that this project has made me a true-believer in custom patterning.
The Inner Shirt
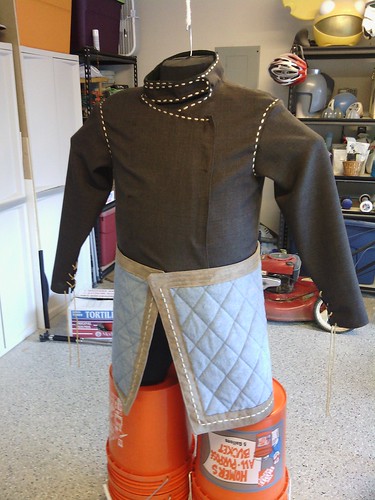
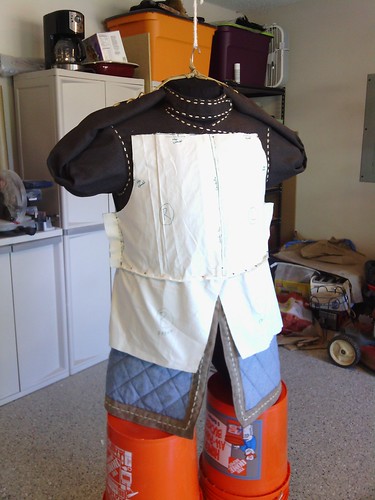
Prior to doing any patterning or sewing work, Wayne and I both made duct tape mannequins of each other for various projects. Take your pick of the possibly hundreds of duct tape mannequin tutorials out there, I won’t go into it here since I wouldn’t be adding anything unique to that topic. I hung my duct tape mannequin in my garage-turned-shop at the same shoulder height as myself, so I had an accurate height reference. My duct tape mannequin doesn’t have legs, so you’ll see it supported underneath by stacks of Home Depot buckets in the following photos, real classy like.
Starting with the patterning for the shirt, I found it’s best to just jump right in and start pinning on large sheets of fabric. I used cheap muslin as my patterning fabric. You can use anything you like, but make sure it stretches (or doesn’t stretch) like your final fabric. I know that a lot of people use cheapy printed fabric, but the solid, blank color of the muslin is helpful in making marks and notes. As you make cuts and refine shapes, you are able to make a once rectangular piece of fabric fit over the complex curvature of your body. However, sometimes the fabric won’t bend right, and that’s where seams come in. I found very quickly that it’s critical to piece together new bits of fabric onto older layers, and then remove it and rebuild whole chunks of your patterns with new fabric. Errors get worked out that way, but more importantly, you begin to gain knowledge of how it all goes together. The more I patterned it out, the more I understood the design of the shirt. I won’t go into “how to sew” or anything, the takeaway from this I learned the importance of making custom patterns.
It's important to note here that I strayed slightly from the design of the character design in the game. Some of the character variants in Skyrim show the armor without the large shoulder armor, revealing the shoulder area of the inner shirt. I don't know if there is any specific terminology to describe the "tucked under" look of the sleeves, but the inner shirt has a layered approach to its shoulder seams. I didn't quite know how to address that during my pattern making, and it's possible I was making it unnecessarily complicated in my own mind. However, my solution was to just sew the shoulders as regular shoulder seams because my costume build would include the shoulder armor pieces, and the armor would cover that area anyways. As you'll read below, I'm all for getting the details as right as you can, but in this particular area of the costume, I could cut that corner without any repercussions later on. So if you have an eye for details and are comparing my work with the character art, understand that I am aware of the differences.
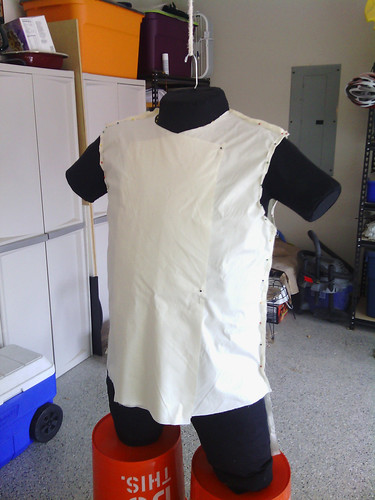
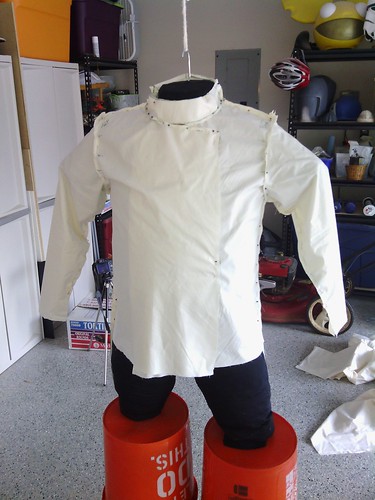
The process was long and tedious, but I found that the more refined my patterning work got, the quicker the pace became. The initial stages of the patterning took the longest, as wielding a rather large piece of fabric while attempting to find your working boundaries can be a cumbersome process. By the end, however, it wouldn’t take more than 5 or 10 minutes to pin a new piece on, test fit, adjust a line, and recut a new pattern piece. Once I had all the pieces finalized, I was able to transfer my patterns to the final fabric and begin sewing.
The fabric I chose was some kind of wool knit. I’m not a fabric expert, so I couldn’t tell you what specific kind. What I was looking for was color and texture. I wanted something that had a thick, exaggerated weave that could still be noticed among the other details on the costume. Considering that the majority of clothing items in Skyrim can be compared to medieval clothing in the real world, I feel my choice in fabric was “period” appropriate. It’s slightly itchy, though, so I lined the neck with a t-shirt style cotton. I would be wearing a t-shirt under this as well, so for the most part I was protected from the itch fabric, but I really didn’t want to scratch my neck raw over the course of a few hours while wearing the costume.

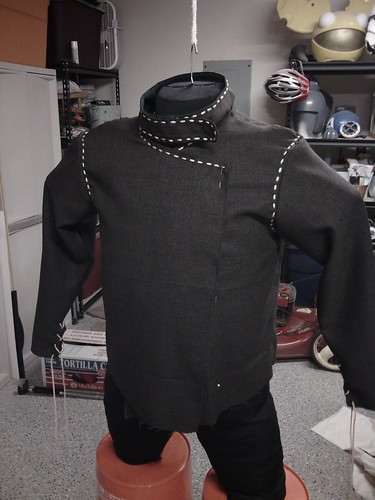
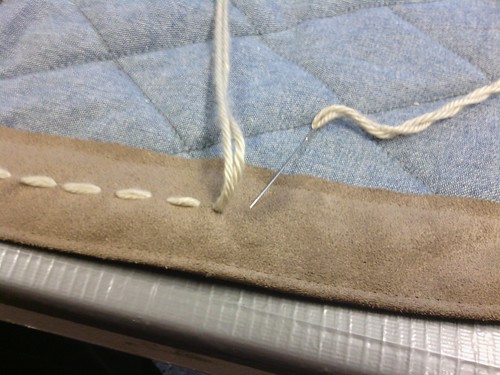
The thing about Skyrim costumes is that the character design is always so very intricate. They don’t leave any detail behind. It’s all there, and I feel it’s important to at least make a stab at all the details, otherwise it might feel unfinished. I’ve always felt that if you add a detail that might not ever be seen or warrant any special attention, it’ll be a nice little surprise for when someone does find it. Doing so is world-building and enriches the history of the character you are presenting. However, if you leave off the details that you think “might” not be seen, all of a sudden it can be like there’s a gaping void there that can’t be ignored. So I try to give all the details at least a little bit of my attention. A detail found throughout the Dawnguard costume is some thick stitching around certain edges. Since machine-sewn stitches would provide the structure, this detail stitching would be replicated in yarn and be purely cosmetic.
The Padded Armor Skirts
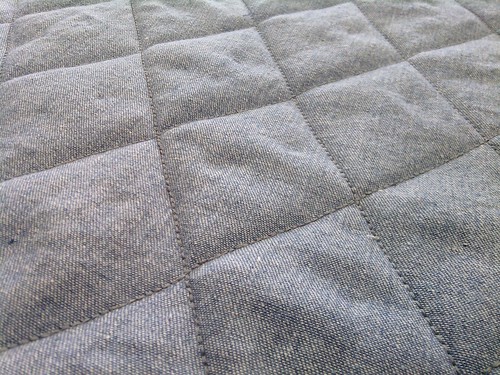
The skirts were made by quilting denim together with the wrong side out. I chose denim fabric for the texture, and the wrong side was used for the color since the right side was too vibrant and blue. It was quilted with a single layer of low-loft batting, which allowed the skirts to remain relatively thin and light. The suede edging was sewn in place and, like the shirt, more faux stitching was added with yarn. The quilting and edging went rather quickly, but each skirt took about an hour and a half to stitch around the edges. The needles I was using would not puncture the suede, so the suede had to be cut with an Xacto blade, hole-by-hole to accommodate for the thickness of the yarn and the needle. Tedious is putting it nicely.
A lot of times I have a general idea of how I want a costume to go together, but the details get worked out as I work. In this case, I didn’t know how I was going to attach the skirts to the rest of the costume. I thought maybe affixing them to a belt would be suitable, but then I realized that I didn’t want to wear too many belts. So I had to attach them to something else. I remembered the modularity of the Dawnguard costumes in-game, and decided that if I ever wanted to venture out in one of the skirtless variants, I needed the skirts to be removable. I ended up Velcro-ing them into place on the shirt. The Velcro would hold them vertically, while the outer vest would provide lateral support against any unforeseen tugging.
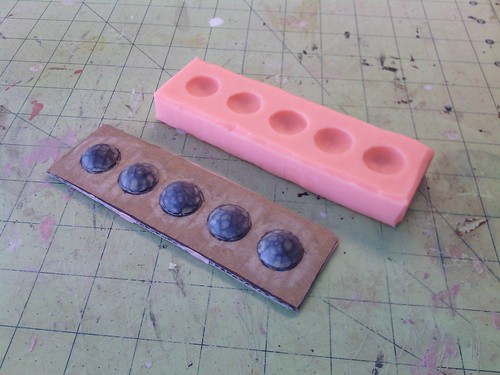
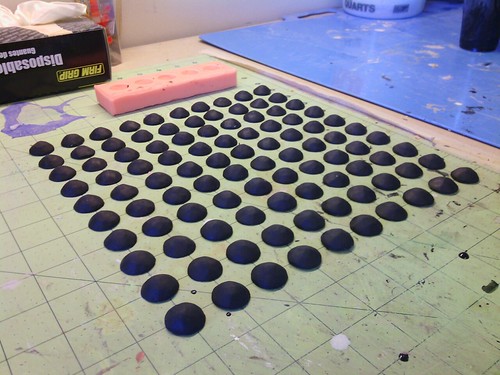
To finish off the skirts, I needed to place a stud at every intersection in the quilted denim. Some intersections toward the top would not receive a stud because they would interfere with the vest and main belt later on, but the bulk of them received a little resin stud. To make the studs, I carved five little bumps out of some 1/4” thick sintra and made a mold of them. I didn’t know if any of them would pull off during regular wear and tear, so I cast up over a hundred studs in total so I’d have extras. After they were painted, they were glued into place with some E6000 glue.
The Armor Vest
The vest began the exact same way as the shirt, with the exception that the patterning was developed with the finished shirt on the duct tape mannequin. Doing that isn’t so much of a fitting (size) consideration as it was positioning and scaling considerations. I needed it to have the correct proportions as the game reference, so working on top of the finished layers beneath it was the way to go. Besides, you’re not really going to mess anything up by pinning to more cloth, at least in this instance.
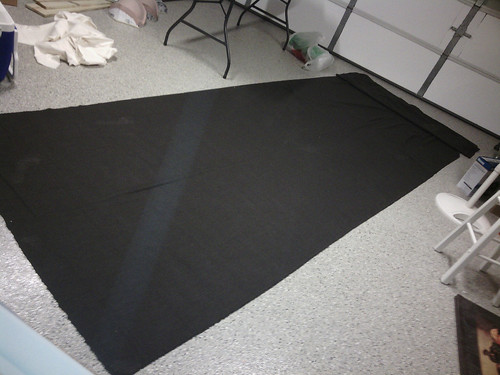
On the reference material from the game, the vest material is somewhat ambiguous. I suspect it’s intended to be leather, but several factors prevented that from happening, among which were cost, time, and capabilities. Instead of leather, I searched my local fabric stores high and low for a suitable replacement and arrived on a waterproof, plasticized canvas that was the right color. It also had a very small, tight weave that didn’t really show too much of a texture.

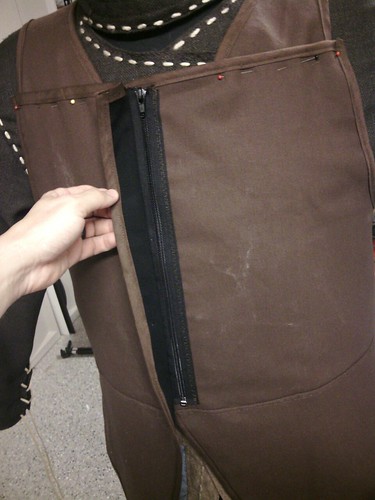
Now the in-game character model shows that the vest closes in the front with three clasps. Not only did I have the time to develop fully working buckles (more on that in Part 3), but I was sure that doing so would not make it look correct, as the buckles would be pulling in odd ways. So I needed a way to close the vest in the front so it would lay correctly on my body regardless of the three buckles. The solution was to hide a zipper as the real closure and just make the buckles purely cosmetic.
At this point, the vest was not complete, but I had to turn my attention to the armor and the gloves, so some of the vest components would sit in an unfinished state for a few weeks. The shoulders were sewn and pinned in place, but I couldn’t permanently install them until I got my materials back from the seamstress that worked on my gloves (more on that below). When I got the materials back, I sewed up the shoulder straps from some brown vinyl and permanently installed the shoulder assemblies into the rest of the vest. Regarding the buckles across the chest, those would not be installed until the armor (Part 3) was installed because I would need the armor in place for positioning.
The Gloves
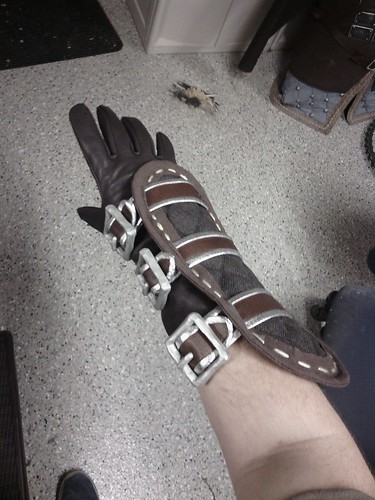
I don’t have much in the way of progress photos of the gloves. The gloves themselves are some generic long-cuffed Renaissance faire type gloves that I ordered online. I figured the glove pads were going to be a little mini project on their own, but I was running short on time and needed to pass them off to a local seamstress to build for me. The design and work involved wasn’t anything I couldn’t tackle on my own, but the vest, armor, and all the various other details were burning up the rest of time. So I made a pattern of everything I needed, purchased the necessary materials, and met with the seamstress to go over the parts I needed her to build. A few weeks later, I had the parts in-hand but quickly found that I needed to modify them. The edging around the glove pads was just too thin, so I had to remove the edging and install my own.
Like I said at the beginning, I really like the fabric work. It’s certainly something I need to know way more about, as my knowledge on the matter is simply making a sewing machine “go.” I can understand folds and seams, and this build in particular has forced me to learn how to make my own patterns, but I feel I haven’t even begun to touch on the vast amount of knowledge on the matter. We at 2StoryProps strive to learn and improve with each project we work on, and the items discussed in just this one post have really pushed me into a place where I can enjoy the fabric work.
Part 1 of the Dawnguard series can be found here. Part 3 of the Dawnguard series will discuss the various armor pieces on the costume, as well as a whole myriad of details that were needed to complete the look. As usual, you can find the full Flickr photo set of the Dawnguard photo here.
No comments:
Post a Comment