August 31, 2010

Daft Punk, Part 1: 3D modeling

I've been a long time fan of Daft Punk. Of course, any fan knows that if you're a fan of Daft Punk, you're not just a fan of the music - you're a fan of the entire experience. The music, the shows, the videos, the costumes, the whole thing. Being a prop builder, my obvious interest is the costumes.

Photo is © Daft Punk
Daft+Punk5

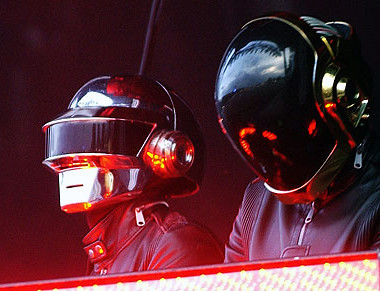
If you're in the prop building community and are also a Daft Punk fan, you're probably already aware of Volpin Props' awesome Guy-Manuel helmet. Volpin pulled out all the stops. It is no doubt that his phenomenal work has inspired me to build my own Daft Punk helmets. As one of 2Story Props' next group projects, I'll be working on both Guy's and Thomas' helmets simultaneously, with a goal of Halloween 2011 (hopefully). Of course, the entire ensemble with include the leather suits and the gloves (or, if we choose to go with electronics, totally pimpin' 70s outfits).

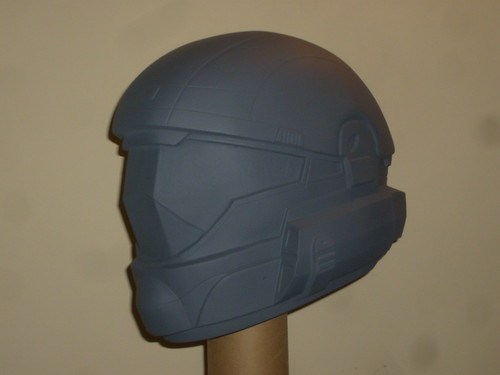
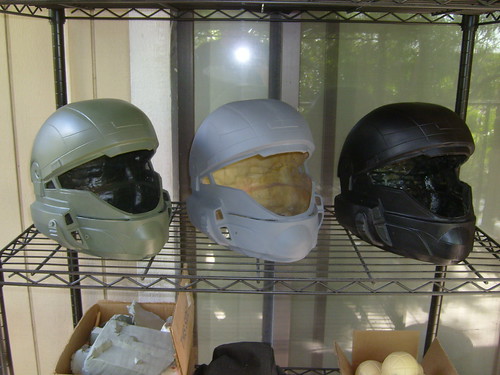
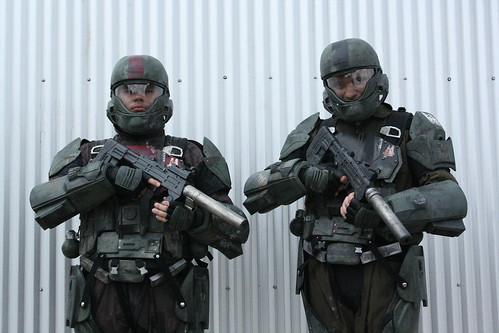
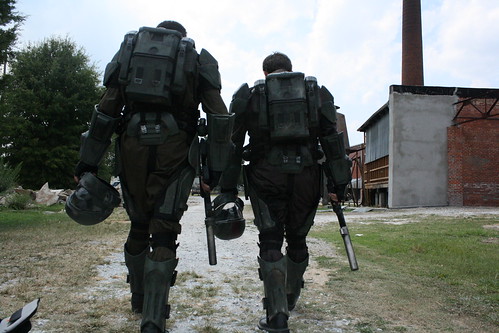
Prior to the start of my Daft Punk project, I had experimented with incorporating 3D modeling into my projects, and implementing it via Pepakura. Pepakura is a Japanese computer program that can import a variety of 3D model formats, and can "unfold" it into flat, segmented components. You would then scale it to however tall you need the model, and then arrange the parts on a grid and print it out. The paper would then be cut out, folded, and glued together. The fan-made prop community has utilized this method to a great extent. Seasoned prop builders often scoff at the idea since a good amount of pepped projects end up with (frankly) such low quality. But that's another rant. Knowing how to use it correctly and knowing your way around 3D modeling comes as great benefits to the method, and it can be used quite effectively. Most recently for me, the ODST project included several 3D models (designed by yours truly) and built via pepakura.

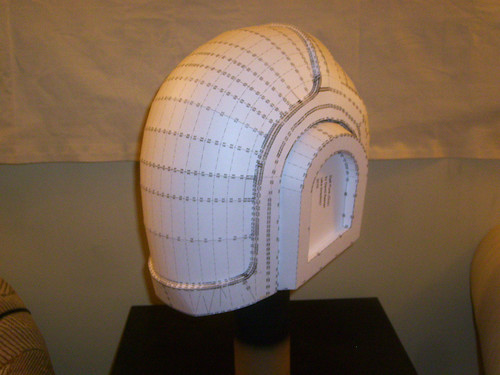
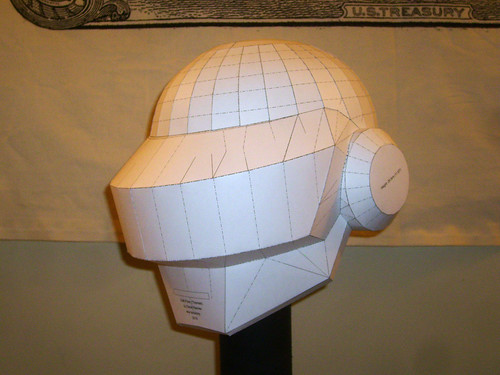
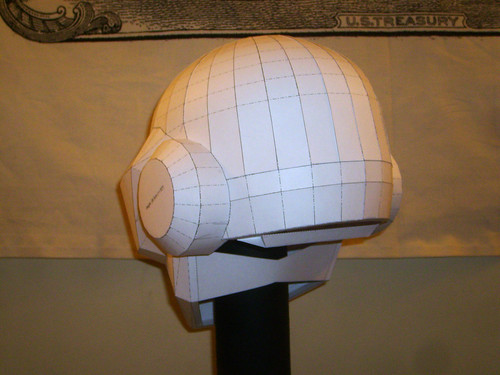
Back to Daft Punk. The Guy and Thomas helmets, with their simple shapes and smooth surfaces, are perfect candidates for pepakura. The trick, however, is finding the right references and finding the right scale. When choosing the right references, it was important to focus on silhouette rather than overall view - the chrome finish on these helmets can be tricky in certain lighting, and given the large, bulbous shapes on these helmets, the right angle can mean everything when designing the 3D model. As for the scale, since the original helmets are fit only to the two DJs and no other people (except for the instance in Electroma, which were secondary/background helmets), there is hardly enough reference to go by when determining the proper scaling of the helmets. And scaling is everything with these helmets - a half inch too tall, and it's WAY too big; a half inch too small, and its WAY too small.

The 3D modeling portion of the project went rather quickly, mostly due to the simplicity of the helmet designs. I had some modeling practice on more detailed Halo helmets, so when the Daft Punk project started up, the technical aspect of designing the 3D models was a breeze.

3d01

3d04

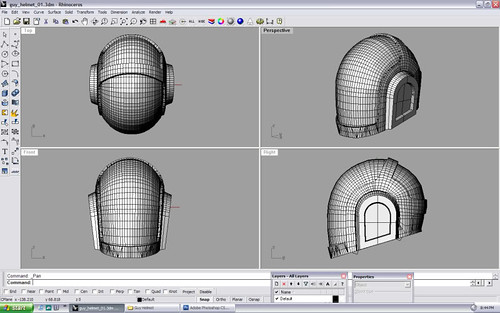
Also having done several Pepakura models prior to this project made the Pepakura designing stage rather easy too. However, knowing how you will build the paper model in advance always helps out when designing the Pepakura model. It's also critical to know how the paper will naturally bend, as well as knowing where your folds will be. With Pepakura, it's always best to not make any folds unless its absolutely necessary, or unless the model has a physical edge at a certain point where a fold makes sense. With the Daft Punk helmets, there aren't many folds to make except for glue tabs. The naturally-flexed paper (as opposed to folded) would later prove to hold stronger and more accurate shape in the paper stage.

DaftPunk_Guy_by_torsoboy

DaftPunk_Thomas_by_torsoboy

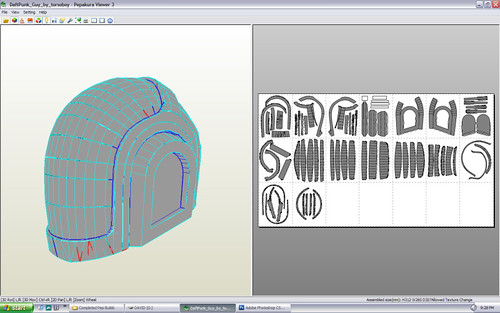
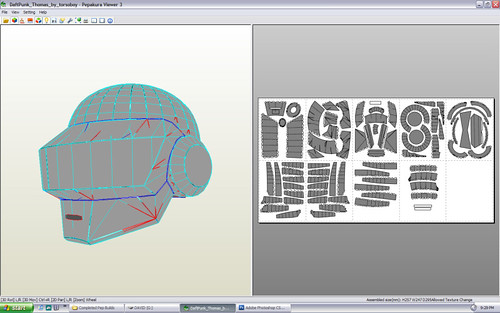
Both models went through three versions of the paper model. The first two versions of each helmet were scaling tests. In each case, the first helmets were too small and the second helmets were too big. It's pretty funny when looking back at it.

S7001480

S7001481

S7001469

S7001470

In the next installment of the project, you will see the helmets after having received fiberglass reinforcement to the paper model, and the initial sculpting phases. That will definitely have to wait a while, though, as we still have two more ODST costumes to build, and I have to move to my new apartment! So expect to see more major updates to the Daft Punk project in November or so.

August 27, 2010

Proton Pack Mark V: The Video Game Version

This project has a pretty interesting history, but to understand what it is exactly I’ll need to provide a brief history of general proton pack design.

The proton pack is the key piece of equipment used by the boys in grey in both Ghostbusters (1984) and Ghostbusters 2 (1989). The prop is essentially the same in both films with very minor differences such as the angle of the gun mount and the color of the crank knob. As a result of this similarity, pretty much everyone who has built a movie Ghostbusters proton pack has strived to make the model seen in the films, which more or less is identical to the ones seen in the 1984 film (Some people have made packs based on the cartoon but that is another story)

Ghostbusters 2 Proton Pack
gb2pack_playskool2000

After 25 years of being unmodified, Ghostbusters: The Video Game was released in 2009 and puts a new twist on the pack. The game is basically the third movie and takes place in 1991 where your character, only known as “Rookie”, is the new experimental equipment technician and must test the new equipment Egon and Ray have developed to increase the abilities of the pack. At the start of the game the proton pack is similar to the ones seen in the films except it has a few cosmetic differences and more lights; some of which serve as your health and pack overheat indicator.

Ghostbuster: The Video Game Pack Early Shot
protonpack

As you progress through the game the pack receives add ons to help you deal with new ghost and solve some in game puzzles. Add ons include the Slime Blower MK II, Stasis Stream, and Meson Collider. By the latter half of the game your pack has a lot more lights, wires, and other features than ever seen in the movies.

Fully Upgraded Game Pack
ghostbusters_hero2

So now back to the prop. Back when we were first planning on building proton packs in 2009 (before the game came out). We had a little dilemma whether to make the packs movie accurate or game accurate. After some thinking movie won out due to the time and material needed to make a game pack for 4 people, plus there were not many good shots of the pack back then and no description what all the add ons did.

Earlier this year a few things happened that prompted me to tackle the game pack. First, Dave and I spent a lot of time molding up ODST armor, and I learned the correct way to make molds (the original pack molds were my first molds ever). This made me want to go back and make a new mold for the packs that would last longer and remove some of the imperfection in the Mark IV packs. Second, on May 8th Dan Aykroyd, came to Huntsville to promote his line of Crystal Skull vodka and had a signing on the arsenal. Needless to say I headed to the signing in costume, and Dan signed my pack. While having a signed pack is awesome, it also made the pack unwearable. As Dave put it, “It’s no longer a prop, it’s a collectable.” Since I needed to make a new pack and did the movie version 4 times now (building 6 packs total), I decided to go all out and make the game version.

Meeting Dan Aykroyd
Cropped
IMG00018-20100513-1249

The first task was to modify the original positive we used to make the RCBG packs. The lower shell had a power cell block added while the gun mount on the upper shell had to be modified to have the various indicators seen on the game pack. With these upgrades the master positive was re-molded using much more rubber than the previous packs and multi-part mother molds (another first for me) the make shell removal easier.

New Shell with Modified Gun Mount and Game Power Cell
DSCN5663

For the new gun I took an extra casting of the movie version and built up the slime blower box that gets added on later in the game from balsa. I molded these two pieces together so that I would have one single gun piece.

For the extra lights seen on the power cells and the crank box I used transparent resin with red and white pigment. This provided a piece I could glue on yet allow the light from an LED to show through. Various other add-ons were sculpted from balsa, molded, and cast in resin before being added to the pack. The most notable add on is the slime tank, which is a casting of a 24 oz paintball cylinder.

Molding the Slime Tank
DSCN5753

The green hose for the slime blower is also another first. I started with clear vinyl hose and dyed it Kelly green in near boiling water. Other additions to the pack include more hoses, bungee cords, jumper cable clamps, and vacuum tubes.

Comparison of the Movie Pack (left) and the Game Pack (right)
DSCN5787

For the gun, the round piece was made from plywood and bondo with resin details. The slime blower itself is PVC with a modified wooden light house I found at Michaels. One detail on the gun people get a kick out of is the pressure gauge. That is a normal tire pressure gauge found at Wal-Mart made by “Slime”. So inadvertently, my slime pressure gauge actually says slime on it.

Lighthouse Used on Slime Blower
DSCN5882

Completed Gun
DSCN5885

While I did most of the construction and painting, Dave took some time and weathered the pack up so it has the worn look. For the lights I took some notes from playing the game on how the lights behaved and sent those along with some measurements from my pack to Jupiter Electronics http://www.jupitere.com/ who made an unbelievable lighting kit for this pack. All the lights blink as they should in the game. Everything is powered by a 9.3 V rechargeable car battery. I cannot stress enough the quality of work Jupiter put into these lights.


For those scared of the weight, the whole pack weighs 30 pounds and is supported by an Alice pack frame. The first public appearance of the pack will be at Dragon*Con 2010 so keep an eye out for the pack as well as the full Rocket City Ghostbusters group!

Finished Pack
DSCN6031

For more pictures and details about the development of this pack, please check out the production thread on gbfans .com located here:

http://www.gbfans.com/community/viewtopic.php?f=2&t=12424

Flicker Photostream of Pack Development:
http://www.flickr.com/photos/2storyprops/sets/72157624809079888/

August 26, 2010

Legacy Effects Style ODST

As Wayne headed up the Ghostbuster's group costume project, I took the lead on the ODST group costume project. At the time - and even currently - everyone that was interested in building an ODST costume was really only building the video game version of the costume. There were a few builders out there building the Weta live-action costumes, but for the most part it was all video game versions. One of my personal interests in costuming is taking animated or CG characters and building realistic versions of them. Of course, if there is already a realistic version, that just saves me a step (though I do thoroughly enjoy reimagining an animated character in my own vision of a realistic version). The live action commercial "We Are ODST" inspired me to produce replicas of the costumes worn in their short film.

Screen Capture of the Legacy Effects ODST costumes.
Untitled-25

We both knew that this project would be a crucible of moldmaking and casting, and every step of the way it did not disappoint. As I headed up the project, I took on the sculpting portion of the project. For a few parts, I used the Pepakura 3D files that are freely available on the Halo Costuming Wiki (knowing that they were inaccurate to the version we were reproducing, but it saved time). However, I did not rely on parts that other people have made. For this project, I ventured into making my own 3D models and producing Pepakura models from them. It was a huge learning experience on my part, and I've definitely grown as a prop builder from it. However, traditional methods were also used on several of the components.

One major different between our reproduction and the film-used costumes is that the armor components for our costumes are all fiberglass castings. The film-used suits used vacuum-formed plastic parts. While vacuum-forming would have been way faster, and likely cheaper in the long-run, we did not have that technology available to us for about 90% of the project. So we buckled down and molded every single component. Again, it was a learning experience for us both. I've been familiar with mold making for a few years prior to this project, but this project definitely made me hone my skills and add new techniques to my skillset.

S7100096

S7009551

As it is the case with most full-armored costuming projects, the helmet took center stage in our production. The helmet began as one of those Pepakura models, though about 60% of it was torn away and rebuilt to reflect the Legacy Effects helmet. The LE helmet and the game helmet vary greatly in proportion and details, so it took careful reconstructing on my part to get the right look. It still differents somewhat from the film-used helmet, but for the most part it's pretty accurate. One major aspect of the helmet was the complex shape of the visor. The ODST helmet doesn't just have a visor that can me made out of a motorcycle helmet visor. The project required that we build a vacuum-forming machine and vacform our own visors. We thought about outsourcing it, but we figured that if we're gonna aim for going the extra mile, we better walk each and every step. Initially we failed miserably, but we took another stab at it and got the process down.

S7000286

S7000456

Another major step for us would be solid casting. For most people that probably seems like some too easy for us to consider a major step. However, the complexity of our SMG model made us worry greatly about the process. With a pretty sizable and detailed prop, there are so many opportunities to screw up. But we came up with a method by which we approached the casting in two phases: detail and fill. Again, this probably isn't a big deal for a lot for people, but for two fledgling prop builders that haven't done that yet and are starting it with a rather complex model, it was a pretty big deal.

S7001051

The entire project was probably inspired by the attention to detail on the film-used suits more than anything. For the most part, you only get a faded, hazy look at the costumes during the commercial, and only Tarkov's suit get's the spotlight. But Legacy Effects' efforts to intricately detail each and every suit blew me away. I mean, for like 90% of the short film you wouldn't even see any of the details, but it's one of those things where you would miss the details if they weren't there. It would lack reality. So that inspired me to finish off each suit with the same attention to detail. Each component of the costume ends up being its own little mini project by the time I get to the weathering stage, but the final result ends up being totally worth the all the headaches, the months and months of molding and casting, and the incredibly time consuming task of weathering each and every part for a complete composition.

IMG_1496

As I said in the previous post, a recent shakey situation at work as forced me to pause the project. We were planning on building four ODST costumes by Dragon*Con, but this situation has caused me to start job hunting. I found a sub-contracting job as a graphic designer, and that's keeping me rather busy. So the current plan is to hold off until after Dragon*Con to complete the other two suits. We're gonna try to make the other two suits happen by Halloween, so that gives us under two months. Plus, I will be moving half-way through October, so that will definitely cause us to expediate the process. To help things go faster, we're going to give the two remaining costumes the "rookie treatment," by which they will only be weathered ever so slightly (as if they've only been in a battle or two). A lot of the work is already done, it's just a matter of finishing up a few parts and getting the pieces assembled. Look forward to Halloween time, when we should be able to post photos of the entire crew.

Click here to see photos of the building process of the suits.

Click here to see photos of the finished suits in action.

August 25, 2010

A Brief History of The Rocket City Ghostbusters

As Dave mentioned in his introduction post, the first project that brought us all together was the construction of some Ghostbuster equipment. What started off as a Halloween group costume for three people has grown into a volunteer group currently with four members who have made appearances at various events around Huntsville and have been recognized all around Huntsville. I am of course referring to the Rocket City Ghostbusters.

It’s hard to say exactly when the RCGB got started. We could go all the way back to the late 80s when my brother Kyle and I use to get up every Saturday morning, put on our blue plastic packs, and watch The Real Ghostbusters cartoon show on TV. We had everything Ghostbusters growing up; action figures, the fire house, tee shirts. Everything. In fact, my very first costume was a Ghostbuster when I was four. My mom made my brother and I patches out of felt and got us jumpsuits to wear with our blue plastic Kenner packs. So if you trace it back I have always been a Ghostbuster at heart. Years later in college when I started getting into serious costuming, I was looking for a project that would top the Jango Fett I did my sophomore year of college (GO ILLINI!) when my mom recommended I try to build a Ghostbuster costume. After searching the web I discovered a prop building site, www.gbfans.com, that had forums and plans for how to build your own proton pack replica. Granted I had limited funds in college, so my materials were limited. My first attempt (Mark I) was made of craft foam and paper mache.

Mark I:
100_0716

It came out okay but nothing to brag about. I sold this pack and then tried one out of bass wood (Mark II). It was a move in the right direction, but nowhere near accurate.

Mark II:
DSCN1376

My junior and senior year I had a job, thus money, so I decided that I was going to get whatever I needed to make a good pack. I purchase a vacuum formed shell on eBay and spent 2 months making my first true proton pack (Mark III). At the time, I thought it was beautiful, and I won a $500 costume contest with it and it is still featured on wtfcostumes.com. Unfortunately, I needed money to pay my rent, so I had to sell it. That was the first prop I ever sold without wanting to, and I knew that I would make another one when I could afford it.

Mark III:
collegehumorpic

In 2009 I moved to Huntsville Alabama to start a job at Orion Propulsion (I is a Rokit Scientist) and started hanging out with Ethan whom I went to UIUC with. Early on we discussed making some Star Wars costumes for Halloween since I was originally intending to shave my head and make a kick ass Starkiller costume to join the 501st. Then one day while eating at Rosie’s we discovered that Ethan (25 at the time) never saw Ghostbusters. I put the DVD in and suddenly we forgot about Star Wars and thought about making a Ghostbusters group costume. I really liked the idea, but knew we really needed three people to pull it off. About 2 weeks later another class mate, Nick, moved down here and was in on the project as well. Thus the “Huntsville Ghostbusters” began! (We changed the name to Rocket City Ghostbusters in August 2009 since we thought it sounded cooler.)

When this project started I had a few goals. First, these were going to be movie accurate with no exceptions. Second, the packs (Mark IV) would all be identical. And third they had to be awesome! With that in mind I knew I was going to have to find a way to “mass produce” the packs. After doing some research online I decided to make a master positive from wood, and then create a rubber mold to allow me to pull fiberglass shells. It was during the casting process that I met Dave as I was laying some fiberglass while he was painting something. Not long after he became our fourth Ghostbuster. I won’t spend too much time on how the packs came together since that is documented very well on gbfans .com with this thread:

http://www.gbfans.com/community/viewtopic.php?f=2&t=12424

DSCN5274

Finish Mark IV:
DSCN5630

Rather, I’d like to talk about some of the details that often get over looked. To start with, the uniforms. I am really surprised we have never been asked why our uniforms are not kaki. The reason is that we wanted people to have no doubt that these were not store bought, so we decided to use the charcoal grey suits briefly seen in Ghostbusters II. You actually can’t buy jump suits in this color. We started off with black suits, bleached them, and dyed them with navy blue to get the appropriate color. Jecca is wearing a Dickies work shirt that is close in color to our uniforms.

DSC00094

Our name patches were specially ordered from eBay since we wanted to be ourselves rather than the movie busters, so our patches read out names. Originally we dyed volleyball pads to reflect the movie elbow pads, but since those are not comfortable we decided to go with better looking military black elbow pads. After all, we are not the New York Ghostbusters, so we don’t have to look exactly like them.

The belt gismo was designed by Dave. It is a piece of layered sintra with a custom decal put over it to make it look like a circuit board. The wired and bulb were all laid by hand. Dave even made the holster from vinal and cardboard.

The traps were made the same way as the packs. A positive trap was made from plywood, molded, and then cast in resin. Each buster wears a trap on their belt via a custom made leather holster with a flush mount bracket. At this time the traps are just eye candy although we plan to make a smoking trap in the near future.

DSCN5398

DSCN5465

The PKE meter was hand made by Dave based on concept art for the Video Game. He sculpted this from a piece of MDF, molded it, and casted it. This is one of the most impressive pieces of the costume.

S7009892

Additionally, we each wear a Motorola MT 500 radio (same model used in Ghostbusters one) and an angled flashlight as seen in Ghostbusters: The Video Game.

After 6 months of work, the suits made their debut on Halloween Day. We walked up and down Bridge Street and then hit the Madison Square Mall where we couldn’t go 5 feet without people taking pictures. At Nightmare on Clinton we took home Best Group Costume and Second for the entire event. It was one heck of a day for the RCGB. We had so much fun that we decided this was not going to be just a Halloween costume, but like the 501st we were going to use this costumes for various charity and volunteer events. Since Halloween 2009 we have made appearances at Yuri’s Night, Free Comic Book Day at The Deep, and the Good Day Kids Festival at Lowe Mill. At each event, we have a hard time moving since we are stopped every 30 seconds for pictues, but I think I speak for everyone when I say meeting a Ghostbuster in real life is an awesome experience.

Even more awesome? Earlier this year we decided that we wanted make our uniforms a little more distinctive so people would know we are specifically the Rocket City Ghostbusters. Thus Dave with his skills in graphic design created a new No Ghost patch where the cross bar is removed and in its place the red NASA swoosh goes across the patch (The Huston Ghostbusters have a similar patch where they also made the circle blue to look closer to the NASA patch). We had this made up and now we have our own franchise patches!

logo01

So that is the Rocket City Ghostbusters story in a nutshell (I could go on and on and on). We will be making appearances in the near future at Dragon*Con, and keep an eye out for us as October rolls around. Later on I’ll be adding a post about our newest RCGB prop, the Mark V Video Game Proton Pack!

If you are interesting in an appearce by the Rocket City Ghostbusters please email us at 2storyprops@gmail.com or rocketcitygb@gmail.com!

2Story Props

So we've been working as a team for a little under a year now. We started off as two independent prop builders that - unbeknownst to each other - were neighbors (upstairs and downstairs). One day we were both out working on our projects, I believe I was working on some Star Wars helmet or something, and Wayne was working on Ghostbusters proton pack molds. I remember looking down and seeing that he was making molds, but I did not recognize the parts. I thought they were custom automotive parts (dash board parts, stuff like that), because people do make custom interiors and stuff. He looked up and we started talking. Immediately we took interest in each other's projects. Wayne was building a team of three movie-accurate Ghostbuster costumes for himself and two of his friends, Ethan and Nick. About a week later I would join the team as their fourth 'Buster.

S7000199

2Story Prop's beginnings was Ghostbuster props and costumes, and Ghostbusters is still very much a prominent subject for our work. However, Halo 3: ODST was getting ready to come out, and we had recently seen the live action commercial for it. "We Are ODST" inspired our next project - ODST costumes styled after the Legacy Effects live action costumes.

IMG_1521

Numerous side projects fell in between molding sessions and weeks of casting. After two ODST costumes and four Ghostbuster costumes, we are already gearing up for future projects. We still have two more ODST costumes to build for Halloween as well. It hasn't been until now that we've been able to set up a blog. A shakey job situation on my part has brough the ODST project to a hault, and with Dragon*Con closing in, we're both taking it easy until after the convention before we finish up the ODST project. During that time I've been working on setting up our blog and flickr account. As a result of all these projects over the past year, we're going to be dumping quite a bit of material onto this blog. As projects start up, we're definitely going to make an effort to keep an updated blog to discuss our progress.

We're both very inspired by Volpin Props, both in his props and in his efforts to keep an updated blog (something I've failed to do several times in the past). So please join us in our efforts to keep this thing updated. Post comments, ask questions! We both certainly hope that our blog will not only be a repository for our projects, but we both hope that it will become a community for open discussion on props, costumes, and the prop building industry.