September 15, 2012

New Series Dalek (Doctor Who 2005 to Present)

WARNING! This post covers the development of a 5.5 foot tall robot over 8 months. It’s a long one!

IMG_0040

Normally we would start with a little description of the source material, but for this project I will leave that to Craig Ferguson:

If you have not seen Doctor Who I strongly recommend you take some time and catch up with the new series (2005 and newer, aka the 9th, 10th, and 11th doctor series) not just because it is a good show, but because pretty much anybody you meet at a sci fi convention has seen the show, so you have to be a little bit familiar if you want to hold a conversation.

There are several reasons I decided to build a Dalek. The main one I’ll share is that during the first two Dragon*Cons we’ve attended we saw how popular the show is, but we never saw a high quality, screen accurate Dalek, and I figured it would go over well for D*Con 2012. Additionally, I found out in the fall, just as I started to watch the show, that there would be a local Doctor Who convention here in Huntsville in early June. The only question left was which Dalek to make. There are two versions seen in the modern series; the 2005 series and the 2010 “colorful” Daleks. Many fans do not like the newer ones, but the reason I did not make that one was practicality: between the height and the width, it would not fit in a van or through doors. By process of elimination, I went with the 2005 version.
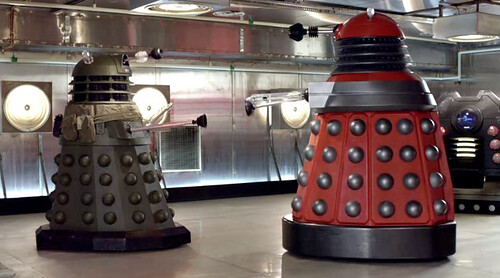
IMG_0055,

2005 Series Dalek (Ironside paint scheme) on the left and a 2010 Dalek on the right.

Cosmetic:

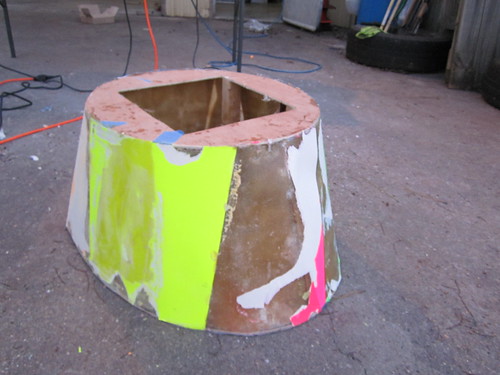
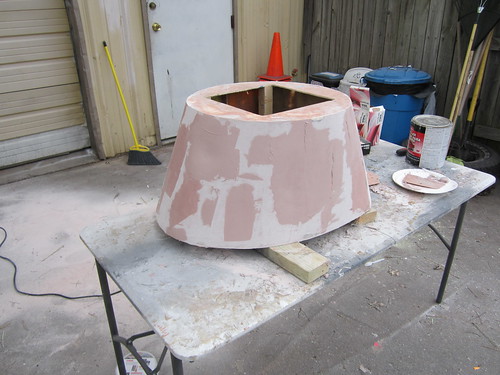
The project started off by downloading plans from the Project Dalek web site. Note that while these provide some of the outside dimensions, the build process is totally up to the builder, and I will point out some of the dimensions are wrong. First, the skirt and bumper were built up using ¼” plywood and reinforcing the seams with fiberglass mat. The outer seams were filled with bondo and the entire assembly covered in Elmer’s wood filler and sanded smooth. You may note my bumper is missing the ledge seen on the show Daleks. This is intentional as the ledge would have made the Dalek too wide to get in and out of standard doors and the elevators in the Marriot and Hyatt.

IMG_0057 IMG_0077 IMG_0084

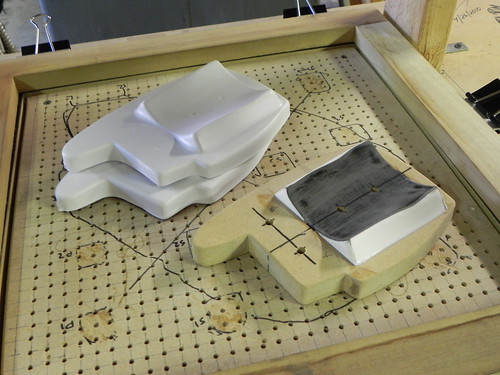
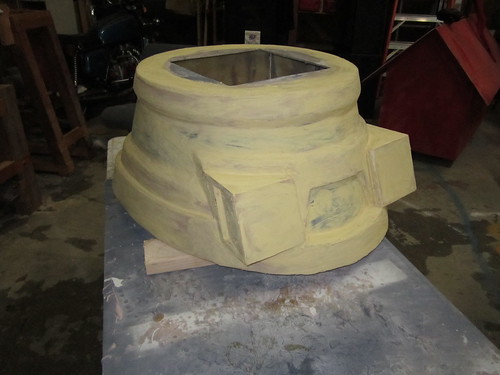
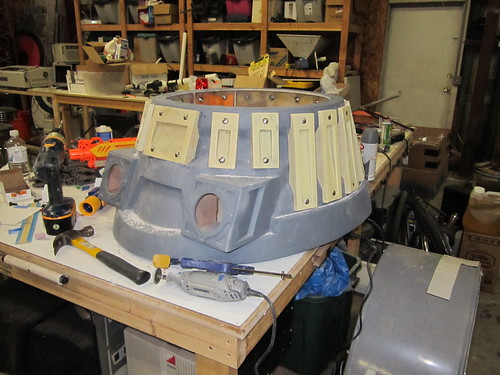
With the base shaped, the next step was the shoulder section. I started off by outlining the top and bottom of the structure with plywood and added temporary supports to hold the pieces at the correct offset. Poster board was then glued to the outside and the entire inside reinforced with fiberglass mat. After the assembly was smoothed with Bondo, the gun mount blocks, made from plywood, where added and reinforced with fiberglass. The outer edge details were created using ½” thick foam insulation, then sealed with paper mache and covered with bondo. The bottom ring received a ring of balsa to reach the correct thickness and provide a little stronger support.

IMG_0109 IMG_0122 IMG_0128 IMG_0149 IMG_0167 IMG_0256

The slats that go around the shoulder section are fiberglass castings. There are only three sizes, with each original made from plywood. A curve gauge was used to measure the contour of the shoulder section and trace it onto the slats so they could be cut and fit properly.

IMG_0297 IMG_0351 IMG_0353

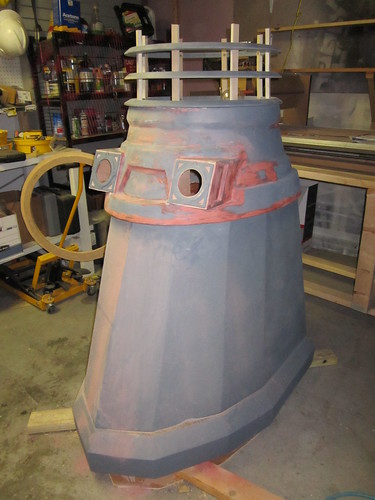
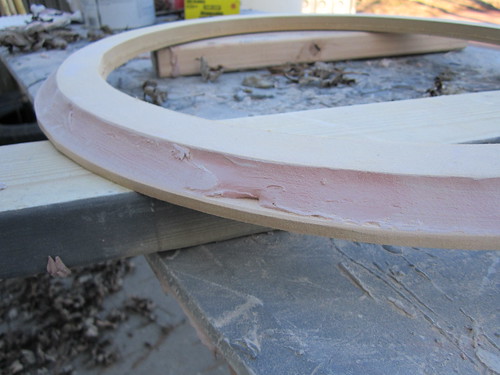
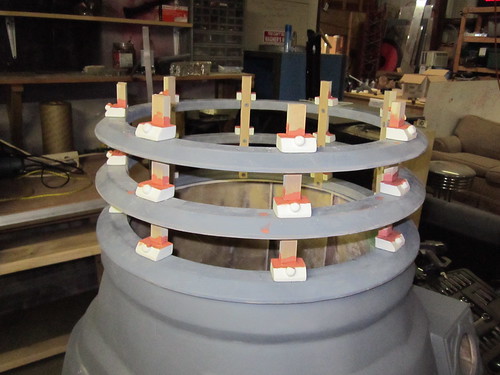
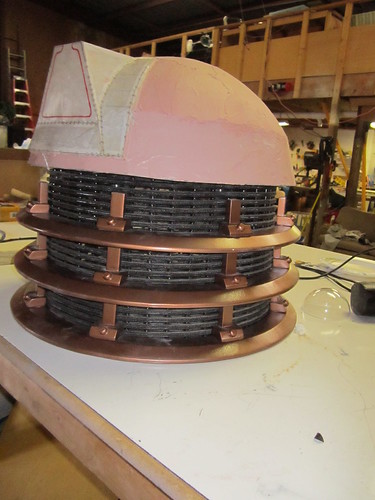
I don’t like routers, so the neck rings were each made from two pieces of MDF glued together and then filled with Bondo to create the proper beveled edge. The three rings were then connected and screwed to 8 MDF supports. The support detail was shaped from balsa, molded and then 24 copies were cast from Smooth Cast 300. The inner neck structure is a MDF frame painted black, then covered with window screen and anti-slip floor mat.

IMG_0231 IMG_0316

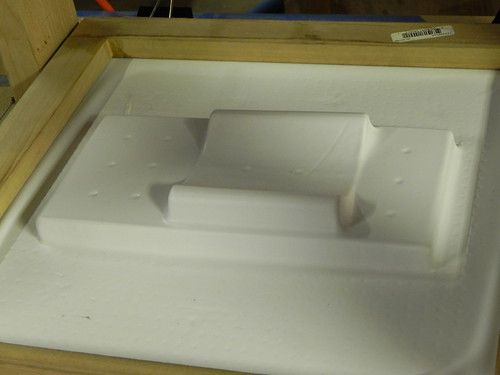
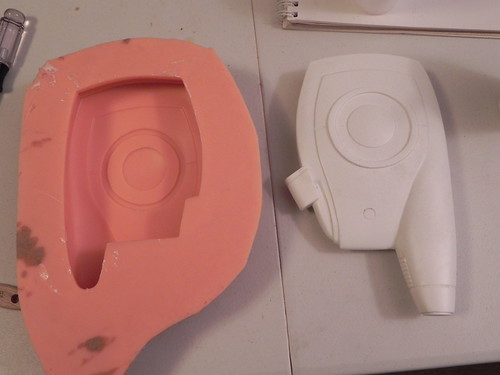
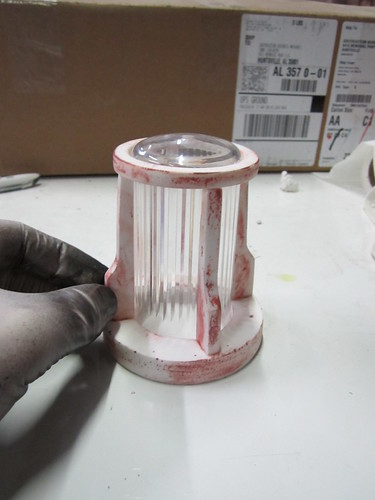
The head started off as a pepakura file designed by Dave. He then glassed it, built it up with bondo, and carved the details into it. The dome lights are MOFLASH lens covers, which are the same model used on the real BBC Daleks. The cage that goes around them was sculpted from wood and cast in resin.

IMG_0470 IMG_0658

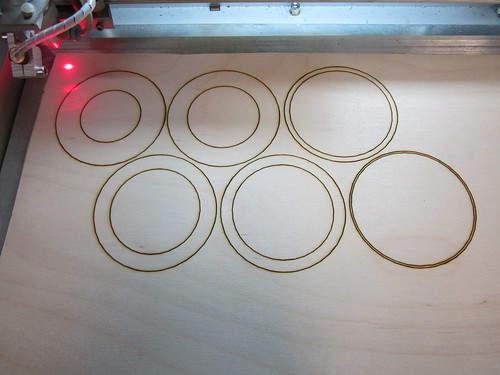
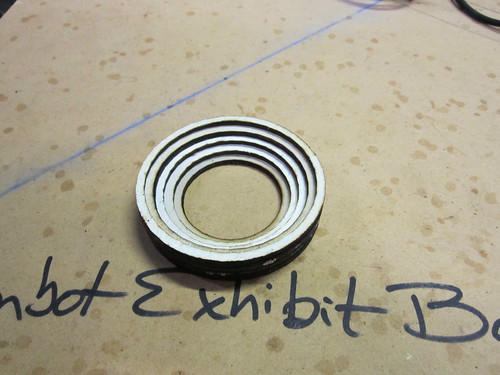
The eye was made using a laser cutter. Several circles were cut out, stacked, and glued to form the “socket” of the eye. The rest was built up with wood and bondo. The rings behind the eye were shaped from MDF, then molded and cast and affixed to an aluminum tube with epoxy.

IMG_0245 IMG_0246 IMG_0310 IMG_0368

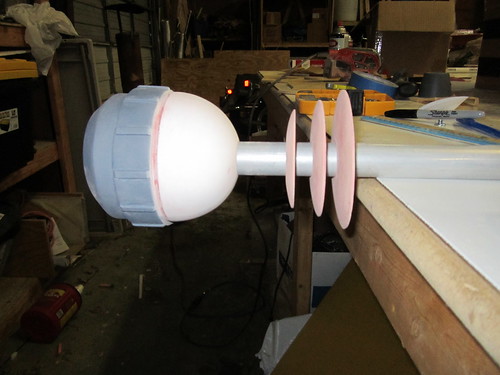
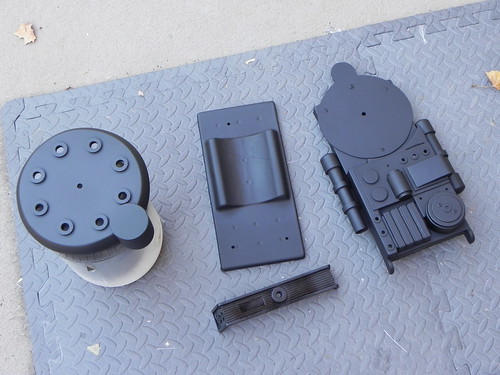
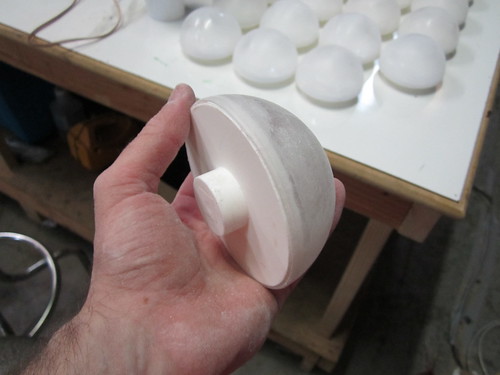
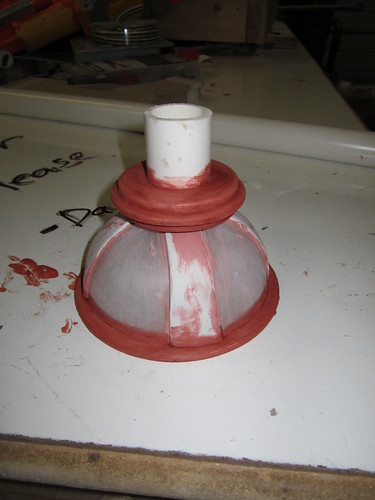
The each hemisphere on the skirt is 3 separate pieces. The ball is a 4” acrylic ornament ball you can find at most hobby stores, although I ordered bulk online as I needed at least 30 of them. The ring that goes around the ball was first made from MDF with a circle cutter, then molded and cast in Smooth Cast 300. A support disk was made and cast such that is gives the hemisphere a surface to hold to and plugs into a 1.25” hole on the skirt for proper alignment. The plastic was trimmed and sanded, the support glued in, the ball ring painted, then joined together and glued to the skirt. This had to be repeated 56 times!

IMG_0502 IMG_0325

One interesting observation was made while casting the rings and supports. Without using any mold release, the molds started to show wear around casting 35 and then “died” around casting 55. Prior to this project, our friend Volpin posted that his Thomas mold crapped out at about 75. I’m not sure what the maximum lifetime achievable of a mold is, but if you need a lot of castings be sure to use a release agent and keep your master positive just in case.

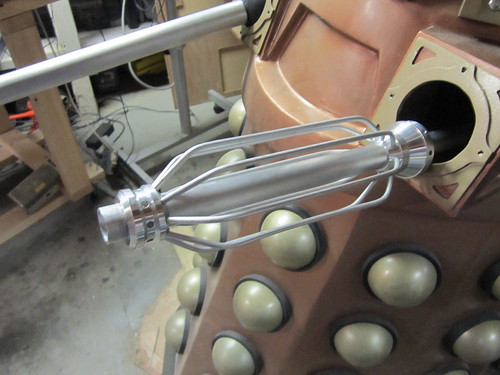
Many people use plungers on their Daleks, which is not accurate as the actual prop is made from various plastic parts available in England. I made a screen accurate version using a 110mm acrylic ball and apoxie sculpt for the raised detail. The support is made from wood and PVC pipe. The laser gun includes aluminum pieces machined by a co-worker from 6061 aluminum. Both “arms” are mounted to 4” balls reinforced with Onyx resin.

IMG_0422

The laser arm consists of two pieces of 6061 aluminum machined by a fellow coworker. The whisk parts were made using an MDF jig and bending each rod to the desired shape. The entire assembly was then glued together with epoxy.

IMG_0694

The entire Dalek was painted with Krylon hammered copper paint, flat black, and Rustolum gold. This may be the last project I use Krylon on because the metallic paint kept jamming on me. If I ever repaint the Dalek I’ll use more of a brass color, but nobody has ever mentioned anything about the color to me and I think it still looks okay.
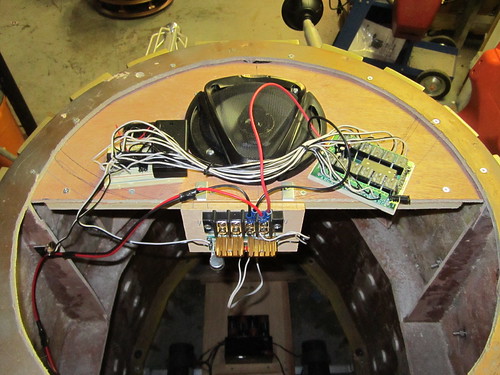
Electronics:

A disclaimer before I start. I am NOT an electrical engineer. I am a fluid dynamics and rocket propulsion engineer. I spent several months researching battle bots, R2-D2s, and electrical safety in general (particularly wire gauges for amperage). Additionally, my electronics are changing as I learn more and increase the Dalek’s capabilities. This post reflects the state of electronics at Dragon*Con 2012.

The base of the Dalek uses 2 wheel chair motors that were donated by Dan Valdez of the Steampunk X-Men. I made an aluminum base to hold the motors in place and give the bumper about 1.25” clearance from the ground. These motors are powered by two large 12 VDC (volts direct current) batteries wired in series to provide 24 volts. The motors have a safety feature of an electronic brake that requires an applied voltage of 24 VDC to allow the wheels to turn. Power is regulated to the wheels via a Sabertooth 2x60 dual motor speed controller which mixes the receiver signal, allowing me to steer with one stick (more on that later). The speed controller is turned on and off using a heavy duty 24 VDC relay, allowing me to turn the motors on and off with a small switch from the outside. All the wires, including those for the head and receiver batteries, are zip tied together and run as an umbilical to the mid-section.

IMG_0008 IMG_0009

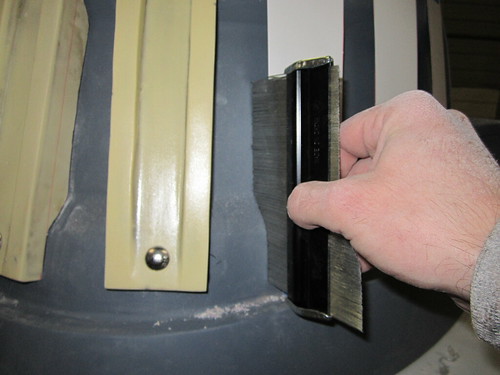
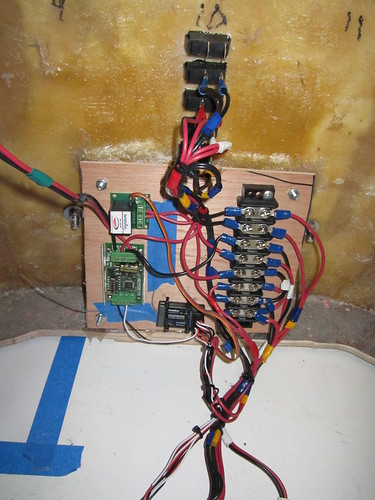
In the shoulder section is a junction board running power to the various components and hooking up to the exterior switches. The switches allow me to turn on the sound, brake, main motors, head motors, and transmitter from the outside. The switches are hidden with a magnetic panel on the outside. The board also houses a Sabertooth 10 speed controller for the head, which uses a 12 VDC geardown motor, a relay allowing me to kill power to the motors using the controller, and a 6 channel receiver for the remote. The main motors take 2 channels, the head takes 1 (currently), and 1 is used for the safety relay.

IMG_0007

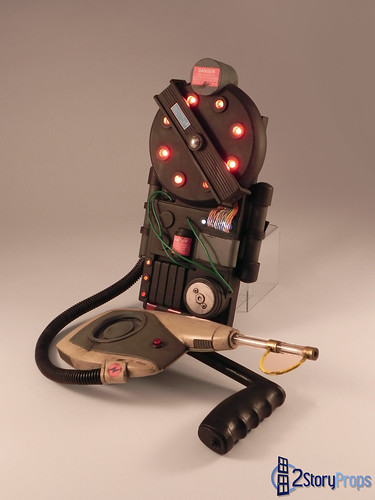
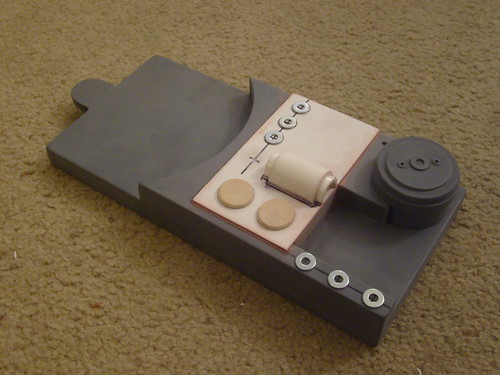
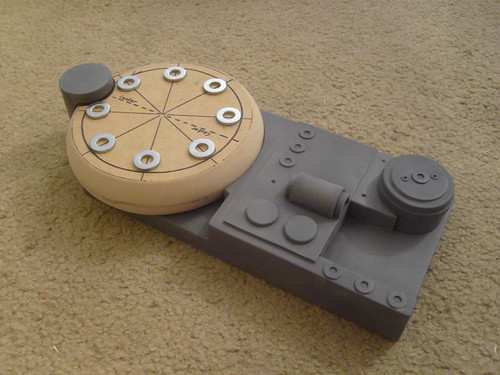
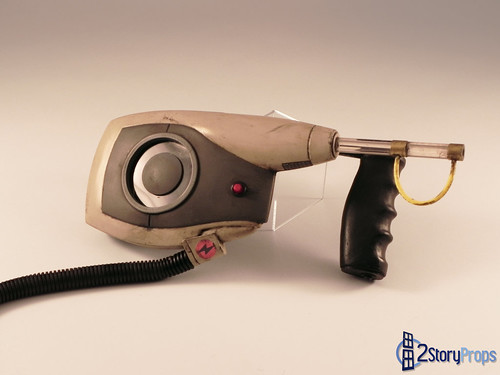
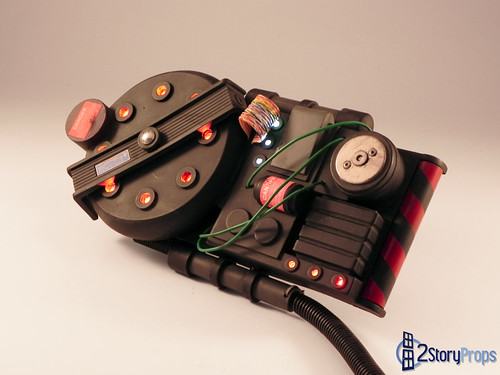
Sound is currently achieved using a sound chip and car speaker. If you remember this post where I added sound to my proton pack, this is pretty much the same thing. There are 10 sound effects recorded on the chip, with each connected to a relay on a 12 channel remote board. Using the transmitter, I can play a specific sound on the chip through a 20 watt amplifier and 5.5” car speaker. I also built a ring modulator to distort my own voice, but it requires a pre amp and won’t be installed until a later date.

IMG_0028 ,

The controller on the right is the controller I use to operate the Dalek. The right stick controls the main wheels. The left controls the head, and the channel 5 switch is the kill switch. The transmitter velcroed to the side controls the sound effects. The controller on the left is an old school model I originally used that burned out on me and caused a lot of headaches.

IMG_0012

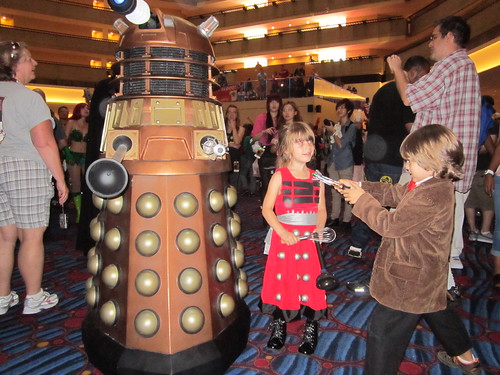
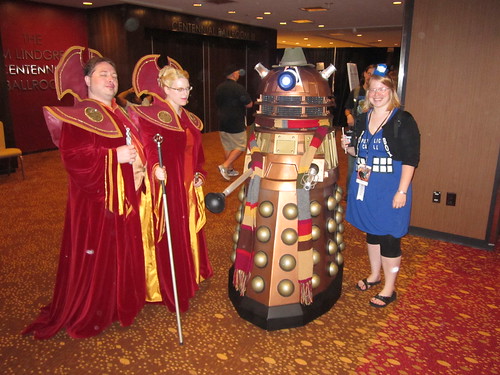
The Dalek made its first appearance at Con Kasterborous in Huntsville, but it was not motorized yet. It was also empty enough that I still could fit a person inside. Once the wheel chair motors and sound were installed, I lost this capability and the Dalek became fully a remote controlled prop. He got an unbelievable reaction there and even ended up on the local news.

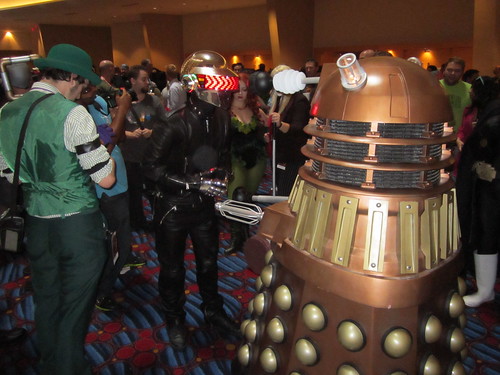
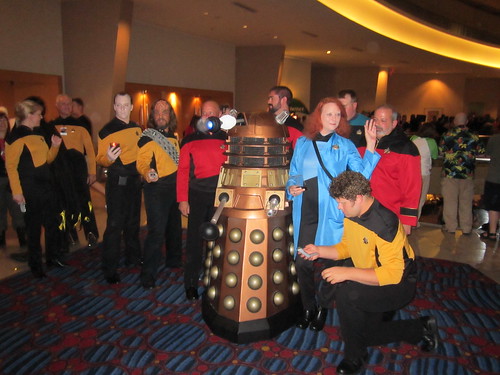
His first motorized appearance was Dragon*Con 2012. While David and I have always gotten a pretty good response from people when we take our projects out in public, the response this thing got was intense. There was not a single second someone was not taking a picture of the Dalek, and many people gave me compliments along the lines of, “This just made my Dragon*Con” and “You won the convention”.

IMG_0145 IMG_0064 IMG_0156 IMG_0154

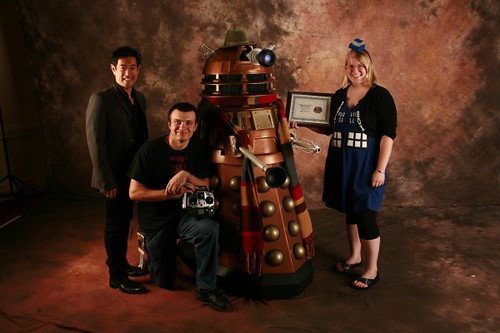
Since the Dalek cannot hold a person I could not enter him in the Friday night costume contest, so I put him in the Masquerade Sunday night instead. The skit was the Dalek was cosplaying as the scariest thing he could think of, which of course is the Doctor. His “costume” consisted of a Tom Baker scarf and a cheap fedora I found on eBay. We recorded a skit with the voice modulator, and took home an award for Best Sci Fi. I will post a video of the skit as soon as I can find one.

IMG_0193 IMG_0488-600x400

This project has had a lot of ups and downs, but the reaction was great and I am pretty sure I’ll be taking him back next year with a few upgrades such as having his eye move up and down and installing the voice modulator so I can talk through him in real time. If you missed him his year and can’t wait for D*con 2013, he is tenitavly scheduled to appear at Charger Con 2012, and will be at Con Kasterborous in Huntsville this June and possibly Yuri’s Night at the Space and Rocket Center in Huntsville in April. If you know of any other events you would like us to bring him, or any of our projects, to please send us an email at 2StoryProps@gmail.com

Finally, this project took a lot of people to complete in addition to myself and David, so I want to give a shout out to a few people who made this possible.

Dan Valdez for the wheel chairs.

Chase Yarwood for advice on the control system.

Mark Wells for machining the laser arm parts.

Tim Heath for letting me tear apart his scooter, borrow his van, and record the skit audio.

Amanda Mangan for kitting the Dalek’s scarf.

Jennifer Paulsen for being the fake operator/ victim in the masquerade skit.

And the folks on project dalek and the R2builders forums.

Stay tuned for an upcoming write up on David’s cheese head and an updated version of our portal gun!

More build pictures here!

September 11, 2012

Dragon*Con 2012. or "Cool Shawarma Shirt Bro!"

This year marked the third year we have attended the convention. While our costume load was a little bit lighter this year compared to 2010 and 2011, we still had a blast. Here are some of the highlights. For starters, David and I are huge fans of the Avengers and all the connected films. Shortly after the movie came out we found this site which sold shirts with the word “Shawarma” written on the front in the Avengers title font. After we bought the shirts we found that one of the restaurants in the Dragon*Con food court serves shawarma, so we decided to wear the shirts and stop there for dinner on Thursday. (Note: If you are new to Dragon*Con or this blog, D*Con unofficially starts on Thursday in that there are already people cosplaying and having a good time.) Without wearing any other costume materials, we went through the hotels to get to dinner and had people stop us to get pictures of our tee shirts. We did make it to the restaurant and we can both say that Tony Stark does have good taste for grub.

IMG_0037 IMG_0038

Later in the night we took out our main projects. Dave took his cheese mau5 head (write up coming soon) out for a spin while I took the Dalek (again, write-up coming soon) for its first test run. At this point we were still wearing our Shawarma shirts. Both of us had numerous people come up and say something along the lines of, “I love your shirt” without mentioning anything about the props. It was a baffling experience but we did get some love for the projects and day 0 was a blast.

IMG_0040

The next two days consisted mostly of checking out vendors and panels and showing off the Dalek. David found some pretty cool Avengers prints by Chris Hamer of urbanpop.com. We have always had a positive response to our projects; the feedback from the Dalek was nothing short of insane. Pictures never stopped and there was always a Doctor Who cosplayer somewhere nearby. One of the many highlights was when our friend Volpin came by, wearing his Thomas gear, and checked out the Dalek. The folks at Beat Down Boogie, who you may know from this video, were on hand and got some great footage which will most likely end up in this year’s D*Con montage video.

IMG_0064

During the evenings we switched out to the mau5 heads. While David had his cheese head and Jecca a red one I made (she added a bow to make it more girly), I brought out an all-white one and a handful of sharpies so people could sign it. We even ran into Grant Imahara from Mythbusters who signed the front as well, although I have no idea which signature is his anymore.

377771_10152126927475604_547608522_n IMG_0092 IMG_0207

This was our second year in the parade. David went with the Venture Bros group dressed as 21 dressed as Sargent Hatred. Myself, along with our friend Ethan who flew in from Mojave California, once again joined the Ghostbusters. Due to space limitations I left the Game pack at home and sported Dave’s Tainted Love pack instead. One side story I will mention is that Ethan had not slept for the 24 hours before the parade due to work and travel. While we were waiting for the parade to start he was falling asleep sitting on the curve, so I put my leg behind his proton pack and he ended up sleeping like that for a good 15 min. I’m sure we’ll find pictures of that somewhere.

336261_10152048728530324_1318292355_o 314176_521677771179987_851694474_n

Sunday was probably our most eventful day. David and Jecca attended the Venture Bros panel with several of the creators and voice actors including: Doc Hammer, Jackson Publick, and James Urbaniac , which basically was run as a 70's talk show titled “Let’s All Smoking.” Afterwards, Dave got Jackson Publick’s signature on his henchmen visors, adding to the two he collected last year. While this was going on, I took the Dalek to the Sunday masquerade competition. Unlike the Friday Night Competition we had Delta in last year; this contest not only looks at craftsmanship, but also presentation and skits. Our skit was called “Doctor Dalek”, which had a Dalek cosplaying as the scariest thing he can think of, which is the Doctor. Originally he was going to wear a fez and a bow tie, but I like how he looked when we put the Tom Baker scarf on him at Con Kasterborus, so we went with that route. A friend of ours from the Maker’s shop, Jennifer, server as the fake operator/ Dalek victim during the skit. As soon as we find a video we will post it to the Facebook page. We took home Best Sci Fi. I am very happy with this because the completion really brought out the big guns for this. Literally, a few of the competitors’ costumes were over 16 feet tall.

IMG_0488-600x400

As usual, Dragon*Con rocked at we had a great time. Concerning next year we will be taking a bit of a pause and we both start looking to upgrade our housing and transportation, which we really need to do now as we are running out of room to put all the props. While David and Jecca will be skipping 2013, I will be back, most likely with the upgraded Dalek and a “smaller” new costume (on the table at the time of writing is the 10th doctor’s space suit or Loki). We are also going to try to pop in some smaller cons throughout the year. In the mean time we have a few more back logged write ups to post in the coming weeks, and I’m sure we’ll have a big write up concerning the Child’s Play auction which will have three Zelda items built by David. Be sure to like up on Facebook to stay up to date with our future projects and appearances! 2012 Dragon*Con Album

September 7, 2012

Tainted Love Proton Pack

I know I have several work-in-progress posts for this project already, but since that was some time back, I figured I'd start from the beginning again. I'm only going to be hitting the major points anyways, so I won't need to finish any lengthy detail discussions. Also, I missed a LOT of opportunities for taking photos for a variety of reasons, so there will be skips in this post. I can't make up for it, so I'm just going to do my best to plow through it. Apologies in advance!

I both love and hate building props from comic books. I love it because it's often times something not used in a primary media (if we're considering comic books to be a "secondary media" to movies, like in this case - Ghostbusters) and is unique to the comic book or series. I also love it because it's rare that you find people actually making things from comic book aside from all the super hero stuff, so the number of potential projects that haven't even been touched by other builders is exceptionally high, and I love having a seemingly "secret" or untouched pool of projects available if I get bored with all the other mainstream stuff.

However, that doesn't necessarily mean it's a happy happy joy joy situation. The big (and probably only) reason why I hate building from comics is that comic book artists, while awesome at their craft, are rarely consistent panel to panel when it comes to details, shapes, and even proportions. They're under tight deadlines and pressure from the publishers, so it's understandable that they'll rush through a page without such considerations, but that doesn't seem to be the case with this particular project. Ghostbusters: Tainted Love was a fantastic little one-off comic book that introduced Ghostbusters fans to a new piece of equipment. It goes unnamed in the comic book, but it's essentially a miniaturized proton pack. It's worn on the arm, and it emits less power than it's backpack predecessors so it will do less collateral damage for house calls. The catch, though, is that it takes all four Busters to use them at the same time in order to wrangle a ghost instead of just one or two using the big packs. Anyways, what's wonderful about this comic book, from a prop building reference point of view, is that the artwork is incredibly consistent throughout the issue, and that made identifying all the parts and details fairly easy.


I began with an oddly-shaped assembly of plastic scraps and Bondo can lids, but quickly decided to scrap that version because it really wasn't looking right at all. Starting over, this build began life as several pieces of layered MDF and sintra. A few washers and sections of PVC pipe were thrown into the mix to finish off the detailing.


I'll go ahead and apologize again here and say that this project turned into one of those back-burner projects, so I ended up losing steam in taking photos. Among the non-existent photos are the the molds for this thing. I made a mold for the main body of the upper arm piece so that castings would have all the details already on them, and all I had to do was paint the cleaned up fiberglass casting. Nothing terribly flashy, and really, it's nothing new for the methods we've used before on previous projects. I also made a mold for the top drum section so that hollow castings could be produced from it as well. Since this was being worn on the arm, I wanted it to be as light-weight as possible. That's really all you should take away from it.

In order for the pack to be worn, a backer piece had to be made, and I decided to make a vacuum forming buck out of some MDF and a section of mailing tube. A sheet of styrene was pulled over it, and then that piece was trimmed and fitted to the inside of the main shell. The little humps you see on it form-fit to the upper arm, and later on a nylon webbing strap would be inserted through it to secure the assembly to the upper arm when worn.

DSCN4339


Additional detailing was fairly straightforward, as it consisted of sections of PVC pipe being fitted to the shell of the main body. Another casualty to my lack of photos was the progression of the bumper piece. Seen in the photo below, the bumper was made by layer several sheets of sintra together with super glue. The ribbing was particularly fun in that I used some ribbed cabinet liner vinyl as the texture. Additional detailing was made by using a few washers, and finally a mold was made for it so I could produce fiberglass copies.


The forearm unit actually went rather quickly, and again I didn't stop to take photos. It was sculpted out of MDF with a dremel, and then detailed with various bits of plastic, some washers, and that same cabinet liner vinyl from the bumper. This component also needed to be lightweight, so I made a mold of it and produced a hollow casting out of Smooth On Smooth Cast 300. This one had some severe undercuts on it, making casting the thing seem more like an acrobatic interpretive dance. Like the upper arm component, it needed a backer piece, so I used the same method and produced a vacuum formed styrene backer that was fitted to the inside of the forearm piece.

DSCN4364

DSCN4367

DSCN4368

DSCN4369

In the above photo, you can see an MDF framework that I installed with a little hot glue. This framework serves two purposes: 1) The back plate bolts to it, and 2) the hand grip would later be attached to it instead of the hollow plastic shell. The hand grip was carved out of some MDF, and was originally intended to be molded and cast out of resin, but time restrictions caused me to use the original MDF master on the current working copy of the proton pack.

After all the components were built and cast, all that was left was to paint it, detail it, and assemble it. After it was painted, Wayne installed some LEDs in the top portion of the pack. We were rushed for time due to an upcoming photoshoot with Dim Horizon at Sloss Furnace, so the forearm unit went without electronics. One thing I wanted to make sure was in place was the correct style on/off button. As it is in the comic book, they turn on the proton packs by pushing a little button on the front of the forearm unit. It's a small detail, but it's fun in that there are no fancy hidden switches or anything to it. Just push it and the lights come on. Not terribly complex at all, but it's still a fun effect.

DSCN4455

DSCN4448

tainted_love_proton_pack_by_torsoboyprops-d4w5ch6

tainted_love_proton_pack_by_torsoboyprops-d4w5c7n

Check out the full gallery here:

Again, sorry for all the skips and lack of certain photos. This post really didn't flow like I had hoped, but I hope you can gleam some usable information from it. Four blog posts in a week really took a lot out of me, especially since I lost steam after that last one. But Wayne will take over for a bit with a Dragon*Con write-up and perhaps another build log here shortly, so stay tuned next week for more updates!