November 22, 2010

Daft Punk, Part 4: Helmet Updates and Fabric Discussion

There isn’t much to report as far as Thomas’ helmet goes since it’s already mostly sculpted, except for two minor things. The first thing is that I’m having the entire ear lathed by a friend in Tennessee. The entire ear is simply a profile revolved around an axis, so it can be lathed. I’d rather hand that detail off to an experienced lather than try to sculpt it freehand twice and expect above par results. The second thing is that I’ve recessed the visor area on the face. I wanted to have the visor sculpted into the helmet so that there would be no question as to where to cut for the visor hole. So I cut the visor out and replaced it with some “For Sale” sign plastic and smoothed it out.

S7000397

S7000407

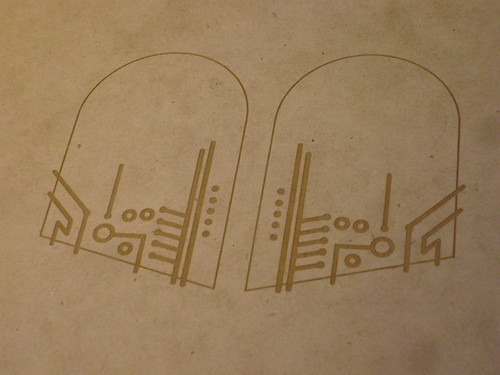
Following in Volpin’s footsteps, I had a local trophy shop (Redstone Recognitions) laser engrave the details on Guy’s ear plates. It really is the best option for this if you want exact mirror images of the details. Not being able to find adequate visual references for that particular part of the helmet, I used Volpin’s ear plates as reference. I drew out the design in Adobe Illustrator and sent in the vector file. For $10 I had him laser engrave two copies of the file on a piece of MDF. The engraving is shallow, but super crisp – and more than enough depth for molding. However, some scaling issues arose between the file transfer. I was using Adobe Illustrator, and he was using Corel Draw. The file should have engraved at exact scale, but it ended up being about ¼” shorter, about 10% smaller overall. For $10, I could have him do another, larger copy of the file to compensate for the scaling issues, but I may be able to work with what I have. I won’t be able to tell until I cut out the existing detail-less ear panel and mock up the engraved pieces in place.

S7000412

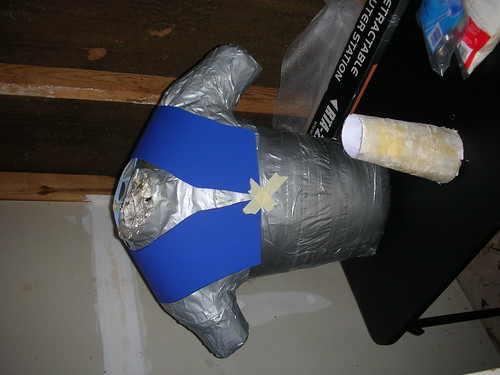
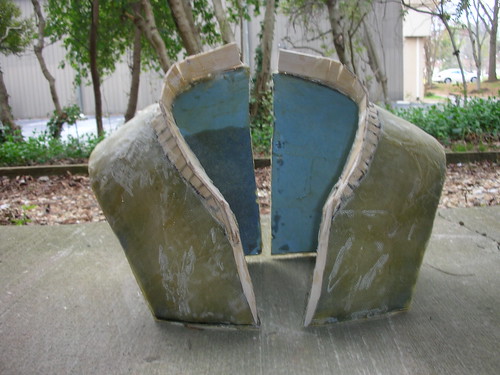
I started sculpting Guy Manuel’s helmet this weekend. Beginning early Saturday morning, I started layering on thin layers of Bondo. I haven’t ever really used the bondo spatulas before, so I figured I’d give it a try. For simple shapes like this, it works wonders. For trickier areas I still prefer applying bondo with my finger. But with the spatula, I was able to apply an even coat over all the surfaces, and I haven’t really found any major shape issues that need to be addressed. Because I had about 4 layers of bondo on the visor, I was able to spend about an hour shaping it with my palm sander, and it was pretty much ready for smoothing.

The rest went super quickly. By the end of Sunday, I had all the surfaces with bondo on them, and I’ve even begun smoothing them out with glazing putty. As of right now, the frame has one good pass with glazing putty on it, and it only needs minor touchups. During the week I hope to start smoothing out the visor and back recessed areas, as well as starting to apply the seam line detail above the ears. Guy’s Tron helmet also has a cap over the normally exposed wired area, so I have to sculpt that detail in as well.

S7000418

S7000442

S7000447

In other Daft Punk project news, I recently picked up some fabric for the jackets and pants. I know I didn’t pick up enough to make both jackets and both pairs of pants, but I have enough for one full outfit and either another jacket or another pair of pants. Judging by the hi-res version of the Tron image in the previous post, I’ve determined that the best available material I can get locally is white fleece-backed vinyl. The fleece-backed stuff has more give to it than the marine-quality stuff (which is usually used for upholstery), and it folds just like the material in the photo. The material in the photo doesn’t appear to be very stiff leather at all, so I figure what I got is one of the best analogs I could find.

One problem I’ll have to face is the perforation in certain sections of the material. Certain panels on the jackets and pants have a fine grid of holes throughout. Those holes appear to be spaced by about a ¼”, so that means a LOT holes. I have two ideas of how to go about achieving the look. I intend to cut a 6” by 6” swatch of material and apply the grid of dots to it with a fine point sharpie. If the dots look like holes at close-enough of a distance, then I’ll have a feasible option. Another swatch will be cut and then I’ll probably apply the same grid with something that can punch the holes at that size. I haven’t figured this one out yet (as I don’t work with fabric often), so any ideas you can pitch will be considered. A third option that I might consider (and it would require outsourcing to someone with the equipment) would be to have the pattern screen printed onto the vinyl. It would have to pass the same test as the sharpie method, but it would go a LOT faster. I have several people in mind for this, so it definitely is a feasible option at this point.

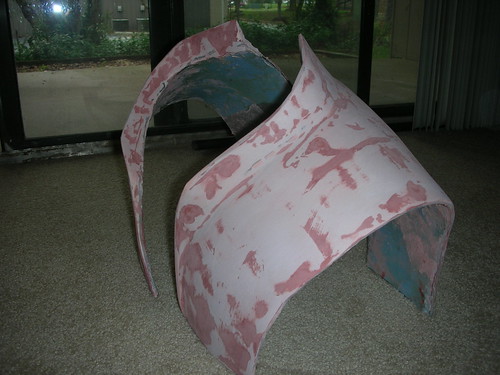
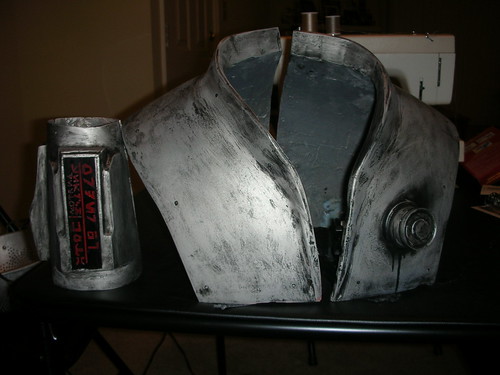
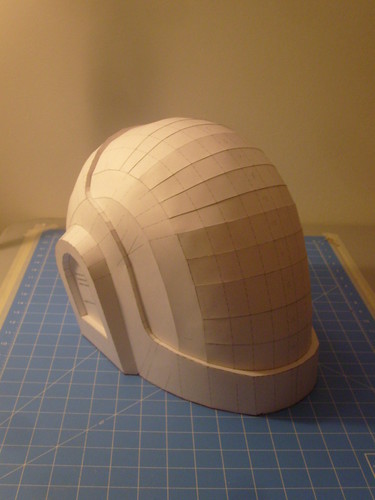
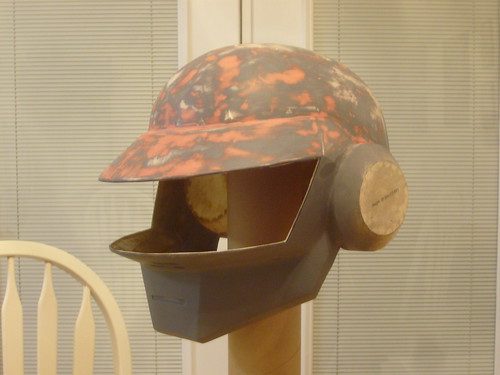
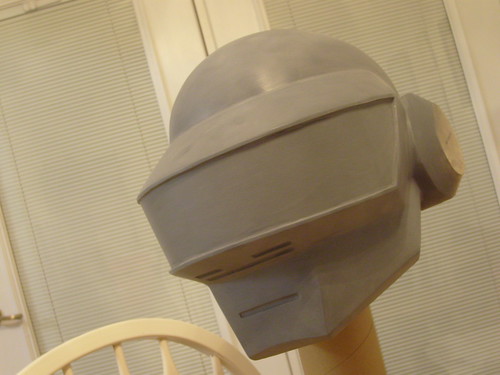
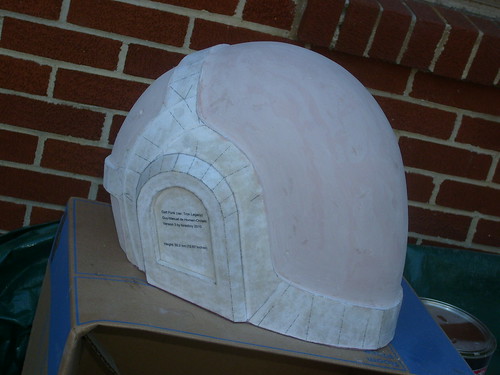
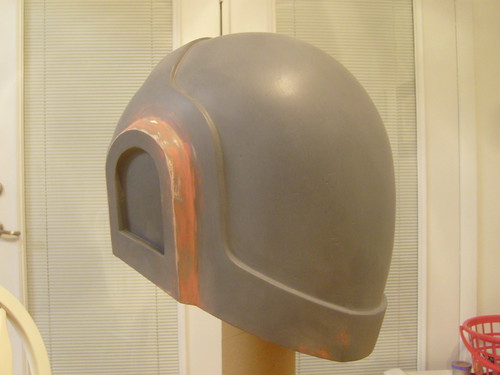
No photos to show of the fabric part yet, as it's just a big lump of white vinyl right now. However, here are more photos of the helmets for your viewing pleasure:

http://www.flickr.com/photos/2storyprops/sets/72157624728828103/

November 14, 2010

Starkiller Armor and Gauntlet

While Dave has been making progress on the Daft Punk Helmets and Tainted Love Pack I have been on a bit of a hiatus due to work and the holidays coming. With the recent release of Star Wars: The Force Unleashed II I figure I’d share an older project I have been working that may get a revisit soon.

For those unfamiliar with the game, The Force Unleashed was released in 2008 and follows the story of Darth Vader’s secret apprentice, known as Starkiller, set between the events of episodes II and III. While there are several costume changes through the game as Starkiller hunts Jedi through different environments, the most recognizable costume for the character is the “Training Gear” seen in the promotional material and the first level of the game.

Starkiller’s Training Gear
SecretApprentice_tfu white

apprentice_turnaround1_copy

I’ve seen a few people attempt this costume with various results, but almost everybody has trouble with the shoulder armor, making it from pieces of sintra or cardboard. I wanted to make my set as accurate as possible, and this was a unique project for me as this was my first time working with fiberglass. To get things started I had my roommate at the time make a duct tape mannequin, of my upper torso so that I would have a copy of my shoulders to form the armor around. I then made a template for the armor from poster board, made two copies, and then taped them to the mannequin.

DSCN4891

The poster board was then layered with several layers of glass and resin to hold its shape. To form the collar, I built up a wall using balsa wood and epoxy. After reinforcing the wood with glass and resin, I used bondo shape the collar the appropriate slope. Then with some bondo, glazing putty, and lots of sanding, the armor started taking shape.

Wood Collar
DSCN4983

Bondoed
DSCN5004

For finishing, the armor was painted nickel and then weathered with engine black acrylic paint and 600 grit wet sandpaper. Before the restraining bolt was attached flat black spray paint was used to put the welding residue on.

Finished Armor and Gauntlet
DSCN5093

DSCN5094

The gauntlet was made in a similar fashion; I made a duck tape mannequin of my right arm, used poster board to make a cuff, and then used fiberglass and balsa to build up the shape. The display is made from Plexiglas with red brake light tape. In case you’re wondering, the text reads, “Order 67, Search, Destroy, Kota”

This technique worked very well and I am really happy with how the armor looks. The problem I found however was that the armor does not allow enough room for the connection straps or the tunic itself, which is due to an issue with the mannequin. If I attempt this again I will be using a freshly made mannequin as well as add padding to ensure the armor has room to breathe. Additionally, the armor will be hallow cast so it will be much lighter and allow some flexibility.

November 8, 2010

Daft Punk, Part 3: ReGuy and Disco Programs

So something had been bothering me about my Guy Manuel helmet, and I couldn’t figure out what. Last week I found out what, and it resulted in a quick rebuild of the entire helmet from the ground up. More on that in a moment.

The Daft Punk project (overall) has taken a new turn in light of new material. In addition to doing the entire score of the movie, Daft Punk is making a cameo in the upcoming movie Tron Legacy. Recently some imagery of their Tron Legacy costumes was revealed on the internet, and it got me hyped about Daft Punk in an all new way. I was a huge fan before, but this just adds way more “cool” to an already over-the-top coolness factor. Since we hadn’t invested any time or money into the costumes below the neck, and since the overall look is just a change of color, the decision to alter the project’s outcome doesn’t really cause us to skip a beat.

Photo is Copyright Disney.Daft_Punk

Back on topic. So I was looking at the new Daft Punk material from Tron Legacy, and I realized that my Generation 2 helmet (the fiberglassed Pepakura helmet from the previous posts) was way off proportion. The visor was too small, the ears were far too large, and the overall shape of the helmet was too rigid, too sharp. So I remodeled the helmet in Rhino with more emphasis on the visor, smaller ears, and a more organic shape to the metal parts; and I used references from the Daft Punk poster from Tron Legacy as reference since that is my new end goal.

There are some pretty major differences between Guy Manuel’s Tron Legacy and HAA-era helmet, which piqued my interest in it. First up, the major difference is that it is now silver (like Thomas’ helmet). The other major difference is that the exposed wiring on the back of the helmet is now capped off with a a dull gray plate (to contrast with the shiny chrome), and the open bottom part on the back of the helmet is also capped as well. The other difference is in the detailing in the ears – the LEDs and the switch are gone, and the ear blocks are now flush-mounted to the rest of the helmet instead of being slightly recessed with a bit of a gap showing. The overall changes are very appealing to me mainly because they are actually changes. The other very appealing aspect to the Tron Legacy helmet is the lighting scheme; rather, the fact that the lighting scheme goes against what you’d expect is very appealing to me. You’d expect the lighting to follow his Discovery-era lighting (following the shape of the rainbow patterns), but instead it just cuts right across the visor in a very unexpected way. Some people dislike it because they say it “copies Thomas’ helmet,” but I tend to be more open-minded and think it comes from a different motivation.

Anyways, enough talk. Let’s fight!

S7000380

S7000381

Click here to see the rest of the photos!