
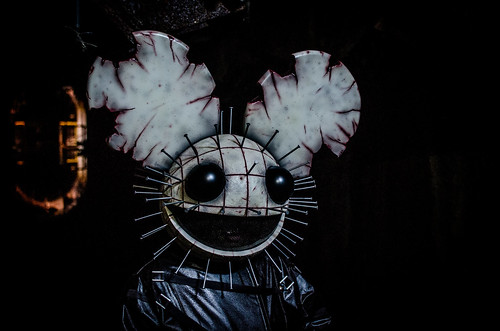
The Pinhead Globe
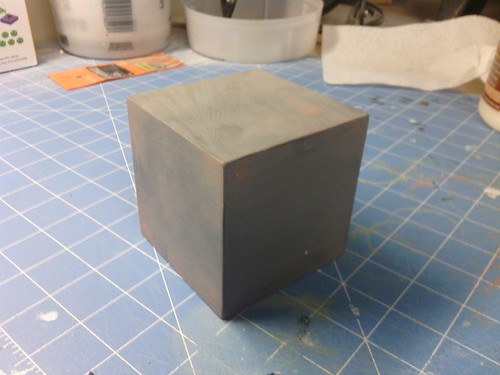
I learned a lot from the Cheese Head, and the number one upgrade on my next head would be to switch from an acrylic globe to a polycarbonate globe. The results from the switch were immediately evident. While the head was a tad flexible when I cut the mouth out, I had no worries that it would crack at any of the newly-introduced stress points like on the acrylic globes. This meant that I could build the head free of any sort of added reinforcement. The price of the polycarbonate wasn’t much more than the cost of the acrylic globes either, making the switch a permanent choice going forward.
However, I did find something worth noting. The diameter of the acrylic globes is 14”. And while the polycarbonate globes are listed as 14” diameter, they are actually 13.75” diameter. Not noticeable to the naked eye (which is good), but it means you can’t use any of the common measurements for the 14” globe. This meant determining an all-new set of measurements.
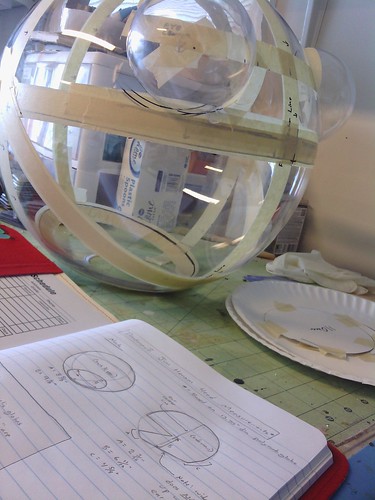
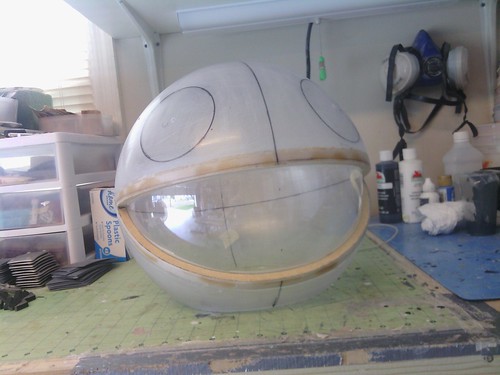
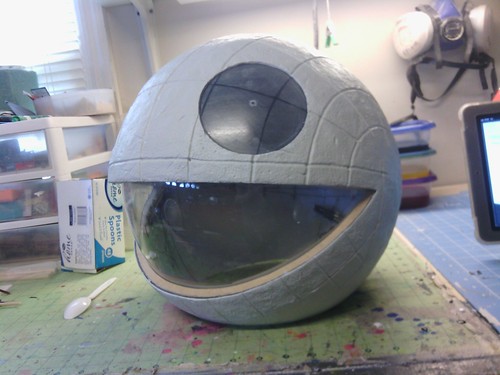
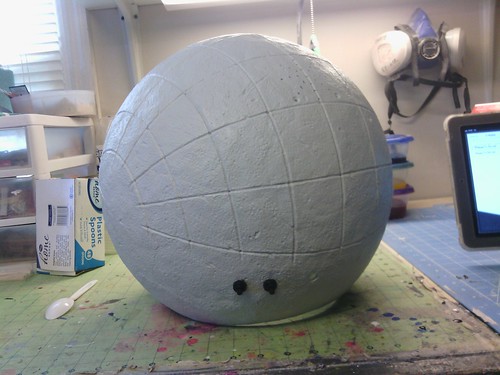
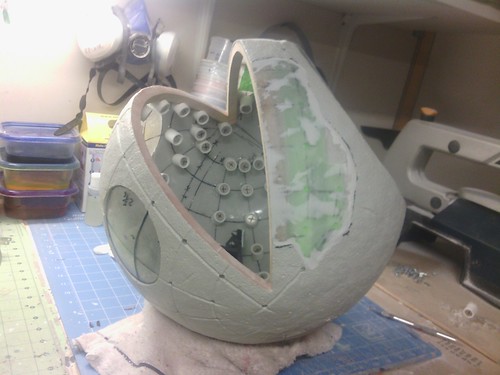
Once I was happy with the measurements, I did the usual – cut out the mouth and install an MDF inner lip all the way around, and position the eyes. In the photo below, you’ll see that I reinstalled the mouth cutout. This was temporary, and only done for reinforcement. I had to set this build on the back burner for a few weeks at this point, and while I was sure it wouldn’t deform during that time, I didn’t want to risk it.
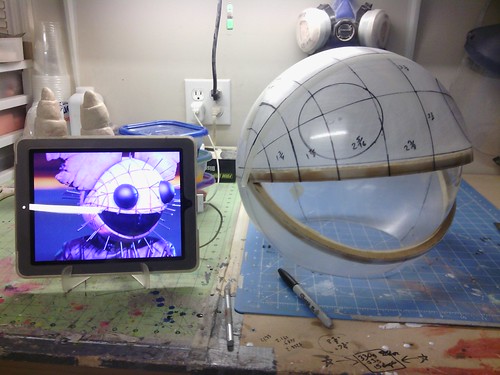
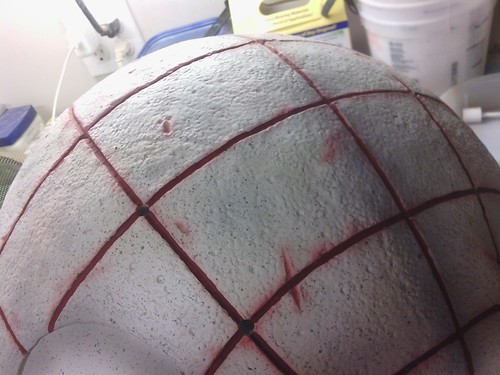
Next, I needed to come up with the grid system. Thanks to the wonderful photography at Rukes.com, I had enough reference to adequately place the grid lines. I slightly miscalculated the top-most row on the back side of the helmet, but the end results work out well enough.
Next was the skin texture. This both excited and terrified me. I knew I wanted to work in Apoxy Sculpt, but I wasn’t sure if it would provide the end result I was looking for in terms of durability. I was afraid that, should I slightly mishandle the head, large chunks of skin would just shear off. Fortunately, the adhesive properties of Apoxy Sculpt worked to my benefit.
Starting out, I created a skin stamp out of Super Sculpey by creating a little pancake-shape and lightly tapping it with small, round objects, such as the end of a paint brush. After baking, the impressions in the Super Sculpey would translate into raised bumps in the surface of the Apoxy Sculpt when pressed into it. The photo of the stamp below is actually the one I created for my Pacific Rim Kaiju Skin Louse project, though the one I used for the Pinhead is functionally identical.
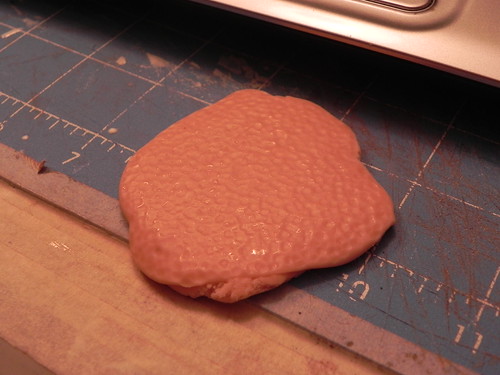
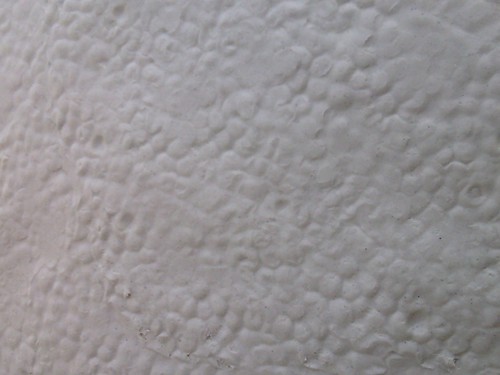
To apply the skin, began by roughly sanding the surface of the globe to give the Apoxy Sculpt more surface area to bite into. Then I simply kneaded out about a golf ball sized lump of Apoxy Sculpt and pressed it onto the sanded surface of the globe, spreading it out while continuing to push it into the surface of the globe. The constant pushing and kneading ensured that the Apoxy Sculpt would take hold of the polycarbonate surface instead of merely sitting atop it. Then, once that section of Apoxy Sculpt was applied, I lightly pressed the skin stamp into it, overlapping each press. After doing that, I used the shaft of a thin paint brush to carve in the grid lines, being careful to follow the grid lines I drew on the globe previously. Working in small amounts of Apoxy Sculpt ensured I would pace myself appropriately to the cure time of the material, but it also allowed me to keep the grid lines in sight. When carving in the grid lines, I was careful to be straight, but I also varied the line and made it intentionally rough. This gave the lines a nice, organic feel to them.
One detail I particularly love was something I found in one of Rukes’ photos, showing what appeared to be holes for a fan. Either the fan was removed or never installed, as the little grid of holes drilled in the head wouldn’t be enough to provide any notable air flow to or from the interior. But countersunk screw holes were found near the fan holes, and being a stickler for fun details, I had to include them.
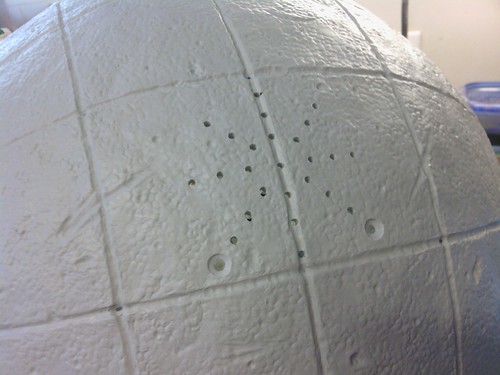
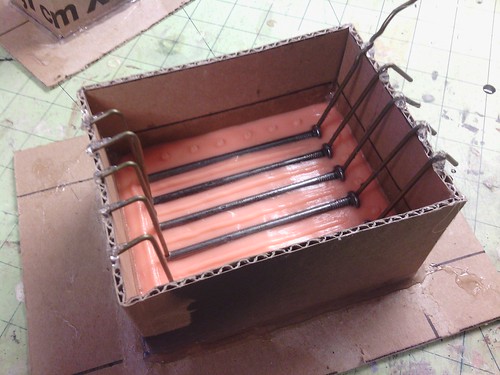
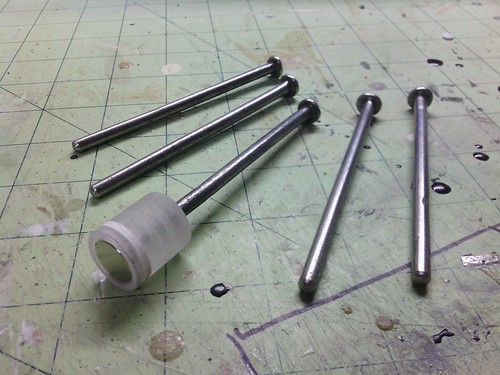
Next came the pins. Using known dimensions in my reference photos, I extrapolated the size nail I’d need to source. However, 77 nails would have added a considerable weight to the head, which meant I would need to cast lightweight resin nails instead. So I made a mold of 5 nails (so I could cast in groups). Over the casting process, I burned out the mold and needed to remold the nails. I discovered it would be easier to mold 3 nails spaced farther apart, however, since the tiny magnets I would place in the mold prior to casting would push each other around in the first mold.
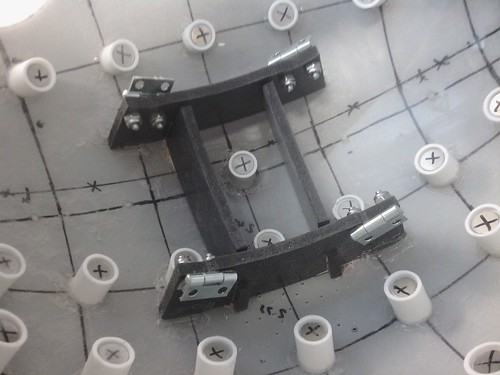
Tiny magnets, you say? The nails needed to be removable for travel and ease of replacement, so each nail got a tiny cylindrical rare earth magnet embedded in the resin during the casting process. The nails would then magnetize to a socket on the interior of the head, which was made out of laser cut acrylic, and then molded and cast in resin. Each socket had a corresponding rare earth magnet glued in, and the sockets were then glued to the interior of the globe underneath holes drilled in the skin texture’s grid line intersections.
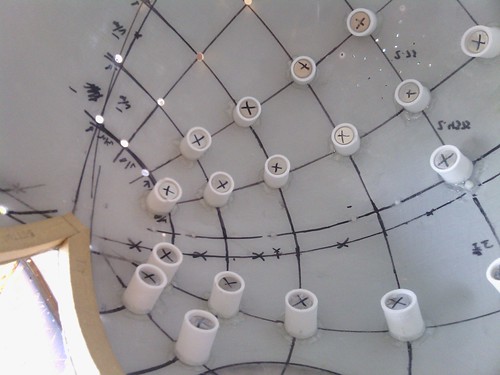
During a test fitting I discovered that I miscounted and had two extra sockets along the lower jaw line. This meant I had to grind off all that Apoxy Sculpt, redraw new lines, and reapply new skin its place. The old holes were backed with masking tape, and the newly applied Apoxy Sculpt doubled as filler in the old holes. New pin holes were drilled, the interior sockets were relocated, and I was back in business.
Part of the weight issues I had with the Cheese Head were the wooden blocks I used to hold the skull cap in place. For the Pinhead, I opted for a lighter-weight solution in the form of some interlocking 1/4" sintra plates. The skullcap, salvaged from the Cheese Head*, would be held in place with some zip ties.
*The Cheese Head suffered some damage when I moved from my old apartment into my house, and so I opted to salvage the skullcap and the mouth piece from it to save me some time and effort when it came to addressing those components.
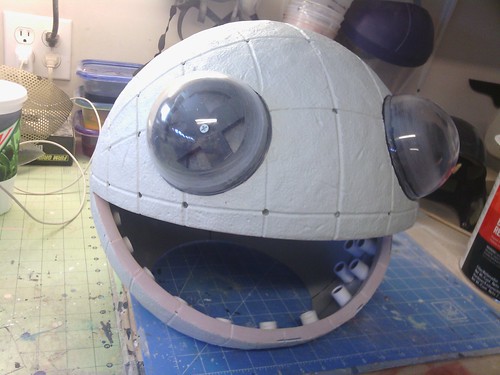
Next came the eyes. You will have noticed already that I did not put the skin texture over the eye area. Photo references show that the skin texture does in fact sit above the normal surface of the globe because the eyes appear to be recessed into it, so I removed that skin material from the Apoxy Sculpt layer before it fully cured, leaving a nice, clean recessed circle.
The vacuum formed eye base plates on the Cheese Head worked out great, and I intend to pursue that as a solution for future heads. However, the Pinhead proved to require 100mm eyes instead of the previously-used 110mm eyes, which meant I either needed to make a new eye base for vacuum forming, or come up with some other solution. I was out of any sort of vacuum forming plastic at the moment, so I opted to fit the interior of the eye with a piece of sintra that would hold a bolt. Effectively I was doing the same thing as the vacuum formed eye base, except it would be permanently installed inside the eyes. At this point, the globe was finished and I could move onto the ears.

The Ears
For months prior to this build, Wayne and I had discussed the possibility of developing a kit. We get lots of requests to build custom heads, but they are simply too time consuming to build and troublesome to safely ship in a consistent manner, so we never take commissions of that sort. The idea of a kit came about where we could offer 2StoryProps-made items for the builder who wants a custom head but doesn’t want to go through all the legwork. Building the Pinhead, and learning from the Cheese Head gave me the opportunity to start on that kit in the form of developing vacuum formed ears.
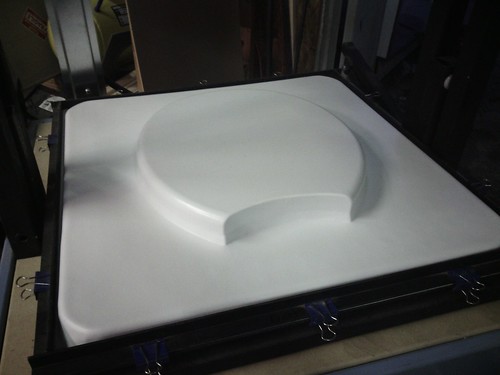
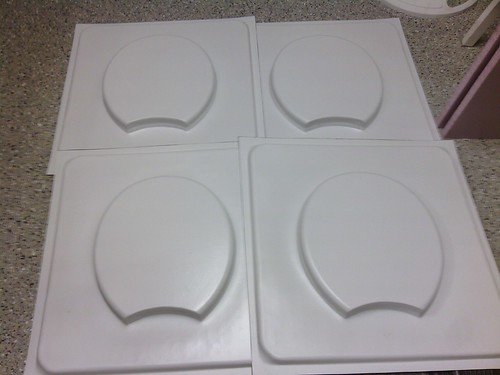
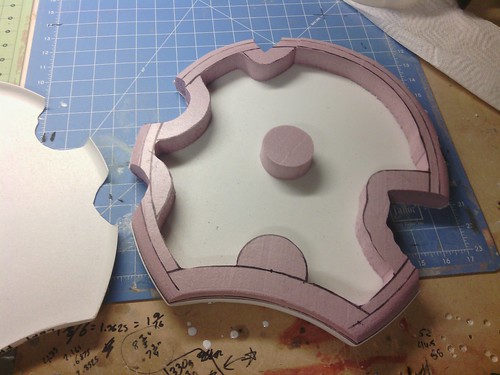
The ears need to be as weightless as you can make them, otherwise the wearer suffers from balance and structural integrity issues. Making vacuum formed ears gave me the opportunity to effectively make hollow ears. However, since the vacuum formed styrene is already so thin, the glued edge needs some kind of backing as reinforcement. The solution is to glue to a foam ring. I could have gotten away with an even thinner ring than the one I cut for the Pinhead ears, but the photo below shows the setup. The puck in the center ensures that the center sections of the ear do not bulge inward. Also, at the point, I made my cuts in the vacuum formed ear panels, since the inner ring would need to follow those contours to allow a sculpting surface later on.
It’s worth noting here that, despite all the effort I put into the ear clip system on the LED head, I opted for the simple bolt-on solution. My deadline for this build was super tight, and I knew I could get away with the bolt-on method in only a few hours as opposed to the several days it may have taken to engineer a way to fit the system in. It’s not off the table for future heads, but this one was just going have to be treated as a special case. Instead of straight threaded rods, I used a large U-bolt , which was secured through the foam ring and out of the vacuum formed plastic shells. Unfortunately, I don’t have photos depicting this.
With the ears glued together, I could start my sculpting work on them. Using templates I developed in Adobe Illustrator, I mapped out all the carved lines in the ears. Oddly enough, the ears on the real Pinhead lack the skin texture that the globe has, but has texture in the form of various cuts and stretch/tear lines. After drawing the cut lines, I lightly etched them out with my dremel. I knew I couldn’t etch too far into the thin plastic, so I really just barely scraped the dremel along the surface, enough to gouge out a shallow groove, but not deep enough to break through the shell.
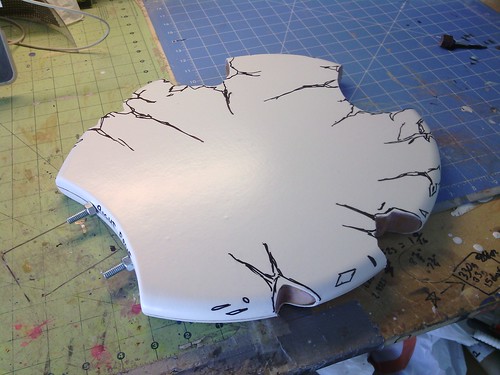
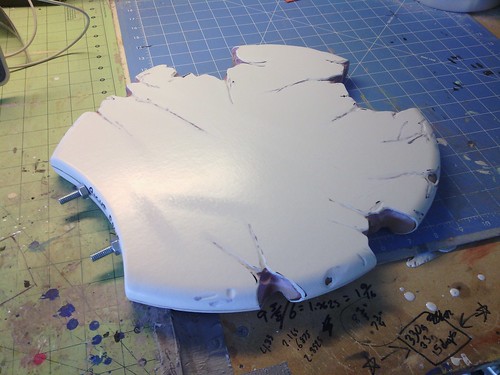
Following the carved detail, I filled in the foam surface of the open chunks with Apoxy Sculpt, creating an uneven, undulating surface texture. The texture on my ear chunks is far more basic than that of the real one, and only done so out of a lack of reference. However, I knew that the surfaces I sculpted would look just as gross once the final clear coat was applied, so I was happy to gloss over it in favor of progress. Once the ear chunks were sculpted and everything was sanded, I was able to begin painting.
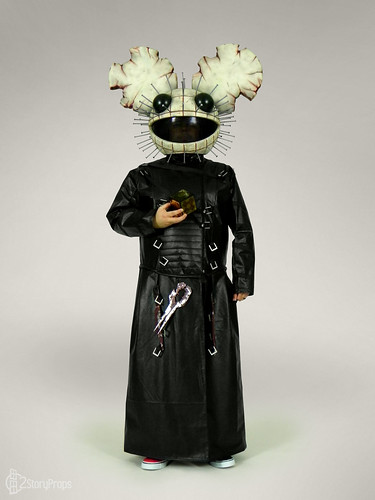
The Paint
The paintjob on this was super fun. I really can’t get over how exciting it was to see this come together, and how excited I was to see how well it came out in the end. After applying a basecoat of simple white spray paint across the globe and ears, I used the airbrush to apply several layers of varied washes of grays and tans. I also airbrushed all the grid lines and various cuts in the globe and ears with some red to simulate enflamed skin around all the cuts. After the airbrush work was done, I used a toothbrush to spray tiny black dots all over the surface of the globe. This was actually the trickiest part, since the toothbrush doesn’t hold a lot paint, and you have to constantly test spray it, lest you spray way too much black paint on a paint job you can’t exactly touch up easily.

The last touch to the paint detail work was some blood red paint applied in all the grid lines and cuts in the ears. After that brush work had dried, I applied a Spar Urethane semi-gloss clear coat over everything to both protect it and to give it a sort of gross, moist look. The neat part about Spar Urethane in regards to this particular project I that it has an ever-so-slight yellowish tint to it, which added to the gross, sickly color of the skin. I was literally jumping up in down in joy after seeing the final result. Certainly, I have plenty more to learn about airbrushing, but I couldn’t have asked for a better result at the time. I still get giddy looking at it up close!
To finish off the head, the eyes were painted black with a satin clear coat over them, and the mouth was painted to a high-sheen black, accurate to the real head. Red automotive strip LEDs were wired up and installed in the lower jaw, and wired to an exterior battery pack. I’m adamant about replicating the logistical details on these Deadmau5 heads, and installing that cord coming out the back of the head was something I needed to see done. I didn’t have time to source the actual battery pack, so the battery pack is actually borrowed from the LED head. Should I come across the real battery pack later on, it’s a simple soldering job to replace it.
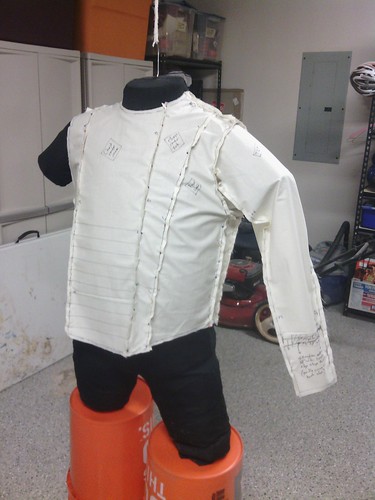
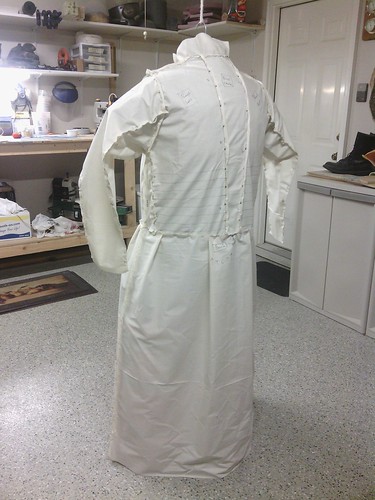
The Jacket
There’s not a lot to say about the jacket, other than I made a jacket. Aside from the interesting straps and Hellraiser style pattern, it’s not really all that remarkable of a garment in terms of construction. To make it worse, it ended up being a huge rush job, and I’m really not happy with the end result. Having improperly identified the waist, the upper half is actually too long on my body. I mean, if you’re not looking for it, you don’t notice it too much. But being that I’m the tailor for my own tailor-made coat, I notice it immediately. For what it is, however, it does the job and I really can’t complain too much when paired with the head in the final photos.
It began as a series of custom patterns I developed on my duct tape mannequin. I used muslin to produce the patterns since it doesn’t stretch, and while I would have liked to use a more supple (and more accurate) garment leather, my budget restricted me to locally-sourced vinyl. So at least the final material didn’t stretch either, which made the patterning process go a lot smoother. I knew that if the patterned muslin version moved a certain way on my body, the final piece would act similarly.

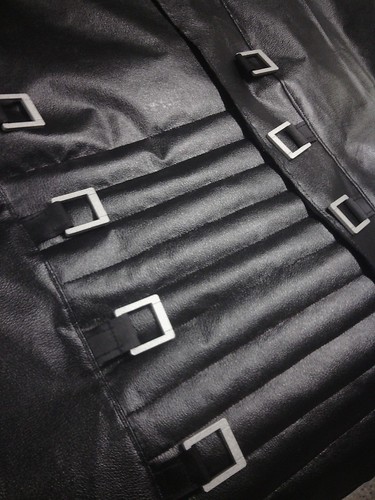
For detailing, I attempted to source the same buckles used on the real jacket, but couldn’t find anything locally or in the right size online, which meant I had to come up with my own version. My deadline was coming up super quick, and since the head was the centerpiece, I opted to go lo-fi on the jacket details. The buckles ended up being laser cut acrylic, as did the three tools that hung at the waist.
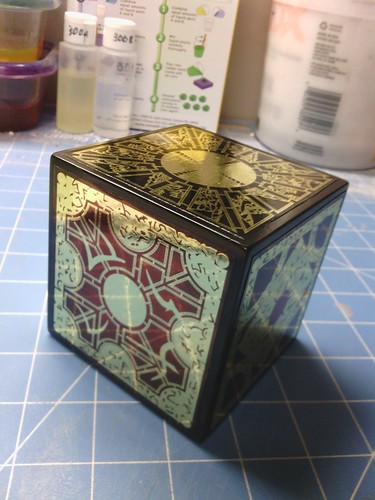
The Puzzle Box
To complete the full costume, I needed a puzzle box! The reference material I had and the research I did produced conflicting results. It appears that the puzzle box Deadmau5 had with him was a transparent red acrylic box with raised, gold detailing. I found a transparent brown acrylic bank version of the puzzle box online, but it was far too large. Additionally, other puzzle boxes I found online were either opaque black plastic, or expensive wooden replicas with brass inlays. I didn’t care enough about this particular component to worry about it too much, so I found a vinyl decal seller on ebay who produces printed vinyl decal replicas of the puzzle box patterns. I ordered a set and applied them to a simple sintra box I built. I didn’t want to bother with attempting to integrate transparent red acrylic with opaque metal foil decals, so I just made the base cube black.
Post Build
While I’m not exactly happy with the jacket, I am happy with the overall result of the costume. I am super pleased with the head itself, and in my opinion it’s one of my more visually impressive builds to-date. What’s even more impressive is that this was done all inside of a two month period, which is lightning fast for me, especially having just finished the exhausting Dawnguard build!
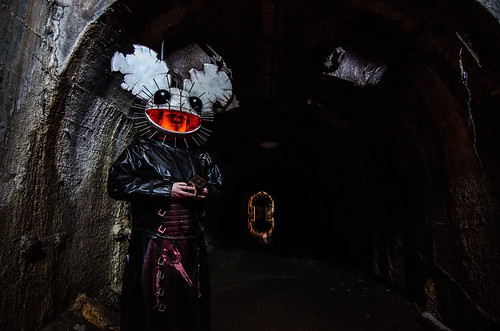
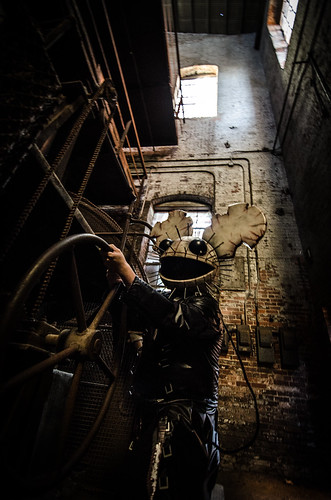
During the build, I thought that this costume would be perfect to photograph at Sloss Furnace in Birmingham, AL, so some of the final photos below are of that photoshoot. Initially I was deadset on not making any convention appearances in this costume due to the fragility of the pins and the ease in which they can be yanked out and stolen. With the trouble I had at Dragon Con in my Cheese Head (people putting items through the ear holes, general rough manhandling while wearing the head, etc.), I’m pretty sure this won’t make a Dragon Con appearance any time soon. However, I might bring it to some smaller, less-crowded conventions in the near future. It will definitely make an appearance at GMX 2015, since that happens over Halloween itself!
Check out the rest of the progress photos and final photos in the Flickr album!
Don’t forget to check us out on Facebook! Like our page to follow us weekly with project updates, How2 Tips, and convention appearances.
- David, 2StoryProps
What resin do you usually put on the paper model?
ReplyDeleteWhile there's no paper model on this particular build, when we do our papercraft work, we use Smooth On's Smooth Cast 300. You should use 3-4 coats of it before starting in on your bondo work. While using fiberglass usually takes care of it in one coat, using this resin is far more user friendly and doesn't have all the nasty side effects that fiberglass work usually entails ("fiberglass itch," loose fibers everywhere, etc.)
DeleteWould you give out the basic measurements for the polycarbonate globe?
ReplyDeleteYou mentioned making kits? I'm looking for some deadmau5 ears I do not have the resources to make them myself.
ReplyDeleteme too
DeleteHello David I was wondering if there is a way to order a deadmau5 helmet from you guys for a present?
ReplyDelete